Coolcoder360's Devlog/updates thread
-
I had written a massive update about choosing an audio library and all that, but then Windows update ate it, so instead I’ll write about the other half of what I was going to write, and save the audio stuff for some other time, like when I’m actually at that point of the project.
I’m currently working on the rendering stuff, the way my engine works is there’s a Rendering thread, and an Update thread, and they need some way to synchronize between them.
I had read at some point a series of articles on making a multithreaded renderloop, which I’ve been referencing and can be found here. This is the second entry, but it has the most exciting diagrams of what is going on, as well as discussions on how to resolve some issues with it, related to jitter, or a lack of smoothness caused by one thread going significantly faster or slower than the other, and frames being skipped over.The reason I’m going with this method is because I need a way to basically take a snapshot of the state of everything, and then chunk it into the render thread, if I use a query like I sort of have been doing right now, there is the possibility for the update thread to remove nodes while the render thread is trying to render them, which could be the case on some of the unexpected crashes I’ve had some trouble resolving and reproducing.
So to avoid issues with my update thread changing/removing entities while the render thread is rendering them, I’m creating a RenderState class, which will basically hold a set of vectors, one for shared pointers to all opaque 3d objects, and one for all transparent 3d objects, the opaque objects will be sorted front to back, and the transparent 3d objects that require blending will be sorted back to front.
This sort is done to optimize for the corresponding shaders, while still allowing transparent objects to be drawn in the proper order.
Then the rendering thread selects a render state that is updated from the update thread most recently, and renders that.
I’m planning to use a partial deferred renderer, where the opaque objects get rendered through a deferred pipeline, allowing them to be lit with a ton of lights, while the objects requiring transparency are rendered using a forward renderer, I believe this would allow me to also use deferred decals on all of the opaque objects, I’m sure a simple quad mesh decal will be sufficient for objects requiring transparency for now.
This whole rendering plan is subject to change of course, I’ve done a bit of research on Global Illumination and I suspect I’ll have to basically completely redo the whole renderer in order to support global illumination, but I have a deferred renderer that sort of handles PBR already working, only issues are it doesn’t do any IBL (Image Based Lighting) or reflections yet.
Gonna work with what I already have for now and perhaps just scrap what I have now in favor of something I create later that can do Global Illumination, I’m eyeing some form of Voxel Cone Tracing, just haven’t figured out if it works well for transparent objects or not, most examples don’t seem to have much in the way of transparency, so I’m hopeful but unsure of how to handle transparency with Global illumination. Who knew rendering could be so painful.Hopefully will be able to have something spewing triangles to the screen within a week or few so I can provide some more interesting screenshots.
-
Well I have now hit the brick wall, the point where I may end up restarting from scratch or burning out to take a significant break from my project.
I managed to finish all my lua bindings for creating meshes and all that and now I’m at the part where I actually test things and see if they run.
Testing things goes as it normally does, find segfault, fix segfault. I usually test compilation regularly, but not always execution regularly, sometimes I need all the parts made and the lua bindings in before I can make a lua script to test. Unit tests may have been useful here but it’s far too late and far less fun to do those.So now I’m at a conniving little segfault. Right smack on an assignment operation. I checked, nothing is null as far as I can tell, let me give some context so maybe someone can help or laugh at how awful this code is and how its better to do it some other way.
Yes I’m using std::shared_ptr and I’m thinking of changing that, since that’s the thing that’s segfaulting, so here’s the line that’s failing:
(*texture) = TextureLoader::getResource(path);textureis astd::shared_ptr<Texture>*, or a pointer to a shared pointer. the reason for that is this is in the luabinding, and the idea is to have a lua userdata that is the shared pointer, so that means I do alua_newuserdata(state, sizeof(std::shared_ptr<Texture>))and that returns a pointer to the shared pointer.
The reason to have lua hold the shared pointer is of course to have the reference count of lua’s reference be included in the shared pointer, that way it won’t get deleted when its only reference is in lua.Now here’s the kicker, I know the textureloader code works, it’s already been loading a logo for months and months now without issues.
And I know this assignment operation works, it actually fails on a second call to it from lua, as can be seen from the log output here:04-20-2021 19:49:26 | D LUASCRIPT: path: assets/textures/Bricks054_2K-PNG/Bricks054_2K_Color.png 04-20-2021 19:49:26 | I TextureLoader: TextureLoader loading: assets/textures/Bricks054_2K-PNG/Bricks054_2K_Color.png 04-20-2021 19:49:26 | D FSManager: loaded file from assets/textures/Bricks054_2K-PNG/Bricks054_2K_Color.png with size 24775201, total loaded datasize: 41202785 04-20-2021 19:49:27 | D Texture: loaded texture with nchannels: 4 04-20-2021 19:49:27 | D Texture: Loaded all the things, scheduled work. 04-20-2021 19:49:27 | D LUASCRIPT: path: assets/textures/Bricks054_2K-PNG/Bricks054_2K_Normal.png 04-20-2021 19:49:27 | I TextureLoader: TextureLoader loading: assets/textures/Bricks054_2K-PNG/Bricks054_2K_Normal.png 04-20-2021 19:49:27 | D FSManager: loaded file from assets/textures/Bricks054_2K-PNG/Bricks054_2K_Normal.png with size 24154252, total loaded datasize: 40581836 04-20-2021 19:49:28 | D Texture: loaded texture with nchannels: 4 04-20-2021 19:49:28 | D Texture: Loaded all the things, scheduled work. Segmentation fault (core dumped)It loads the Color texture just fine, no issues, then it goes to load the Normal texture, that finds the image file just fine, you can see that it finds and loads 24154252 bytes, and it has 4 channels.
It exits out of the texture creation.
Then exits from the textureloader, and proceeds to segfault on the assignment, as seen in the backtrace here:Thread 22 "Nebula3" received signal SIGSEGV, Segmentation fault. [Switching to Thread 0x7fff977fe640 (LWP 17747)] 0x000055555568e9f8 in __gnu_cxx::__exchange_and_add (__val=-1, __mem=0xa32c049ccdffa6c6) at /usr/include/c++/10.2.0/ext/atomicity.h:50 50 { return __atomic_fetch_add(__mem, __val, __ATOMIC_ACQ_REL); } (gdb) bt 10 #0 0x000055555568e9f8 in __gnu_cxx::__exchange_and_add (__val=-1, __mem=0xa32c049ccdffa6c6) at /usr/include/c++/10.2.0/ext/atomicity.h:50 #1 __gnu_cxx::__exchange_and_add_dispatch (__val=-1, __mem=0xa32c049ccdffa6c6) at /usr/include/c++/10.2.0/ext/atomicity.h:84 #2 std::_Sp_counted_base<(__gnu_cxx::_Lock_policy)2>::_M_release (this=0xa32c049ccdffa6be) at /usr/include/c++/10.2.0/bits/shared_ptr_base.h:155 #3 0x000055555568de4b in std::__shared_count<(__gnu_cxx::_Lock_policy)2>::~__shared_count (this=0x7fff977fd1e8, __in_chrg=<optimized out>) at /usr/include/c++/10.2.0/bits/shared_ptr_base.h:733 #4 0x00005555556b7fb2 in std::__shared_ptr<Texture, (__gnu_cxx::_Lock_policy)2>::~__shared_ptr (this=0x7fff977fd1e0, __in_chrg=<optimized out>) at /usr/include/c++/10.2.0/bits/shared_ptr_base.h:1183 #5 0x00005555556b8af6 in std::__shared_ptr<Texture, (__gnu_cxx::_Lock_policy)2>::operator= (this=0x7fff88218af8, __r=...) at /usr/include/c++/10.2.0/bits/shared_ptr_base.h:1279 #6 0x00005555556b8616 in std::shared_ptr<Texture>::operator= (this=0x7fff88218af8, __r=...) at /usr/include/c++/10.2.0/bits/shared_ptr.h:384 #7 0x00005555557745c1 in loadtexture (state=0x5555570a7df8) at /home/alex/nebula3/luatexturelib.cpp:29 #8 0x00005555558e03f0 in luaD_precall () #9 0x00005555558ee4ab in luaV_execute ()The one other hint I have is that adding two log lines to my render loop (separate thread from this, this is in the update thread) will suddenly cause this whole issue to not exist. This would maybe indicate some locking issue, and I inserted it around calling on a work queue that is loaded from the function that creates the texture. That’s all fine and good but when I rip out either loading the work into that queue, or the call to the queue entirely, the problem still persists. And it’s segfaulting consistently here, whenever I’ve had a threading issue in the past, it would usually be sporadic, so far it’s failing on the second lua loadtexture call 100% of the time. Never the first, never any others after that. Never segfaults from any other thread, just consistently on this assignment.
So what are my next steps?
Probably stop usingstd::shared_ptrand try rolling my own resource counter. it would give me more control at least, and possibly fewer possibilities for bugs, and it may already fit considering I already have loaders for resources, just need to revamp those to utilize my customer counter thingies, and then have it count somehow. problem is keeping track of the count, easier with shared pointers if possible. Also there’s a chance that doesn’t fix this issue.Knowing my luck by the time I roll my own resource counter, I’ll figure out that this was some simple fix and fix it. and then it’ll be too late to go back to the shared pointers, and there’ll be tons of bugs in the resource counters to fix. Such is life I suppose.
Oh and maybe I’ll think about adding gmock/gtest unit tests. I haven’t done that in like a year and a half, might be worth brushing up on it again, and I can’t really argue that it wouldn’t be beneficial for if I ever decide to make this engine actually a big thing.
An after note while editing/writing:
the “total loaded datasize” from the FSManager seems to be a bit telling, perhaps things are getting freed unexpectedly by the shared pointers?
The total data size is supposed to be the grand total of all loaded memory, but here it actually decreases between the first and the second loadtexture calls04-20-2021 19:49:26 | D FSManager: loaded file from assets/textures/Bricks054_2K-PNG/Bricks054_2K_Color.png with size 24775201, total loaded datasize: 41202785 04-20-2021 19:49:27 | D FSManager: loaded file from assets/textures/Bricks054_2K-PNG/Bricks054_2K_Normal.png with size 24154252, total loaded datasize: 40581836This could possibly be due to the logo being free of course, however neither total datasize is equal to both image sizes together, instead they’re both whatever the image size is plus
16427584so it seems that the lua textures are being freed when they shouldn’t be, which could be an issue with something else, but would hopefully be 99% fixed by a custom resource counter implementation.Gruedorfing this possibly helped me fix this bug, tune in next time after much excruciating pain implementing my own resource counters to know if that fixed this!
-
Trying to get myself back onto the weekend gruedorf schedule, also managed to basically fix the segfaulting issue I had last post.
The answer was to do this:
         std::shared_ptr<Texture>* texture = (std::shared_ptr<Texture>*)lua_newuserdata(state,sizeof(std::shared_ptr<Texture>));
+        new (texture) std::shared_ptr<Texture>(nullptr);
I found this out from an error in valgrind about something being uninitialized in the assignment operation, so that pointed me in the right direction of needing to call the constructor like this.
Basically the
lua_newuserdata()acts as a malloc, which doesn’t initialize anything. So we call the constructor and that sets up everything.I still need to handle calling the destructor, I haven’t done too much research into that but apparently there is a __gc method I could add to the userdata which I could use to call the destructor on any of the shared pointers, so I think case mostly closed for now.
Didn’t have rendering fully set up yet so no screenshots, also booted back into windows to test on windows and now I’m getting an error of not finding a .dll when I’m trying to statically link with the library, so that’s fun

Can’t wait until I get the docker set up to cross compile for windows, should hopefully be better than dealing with the windows weirdness. But that’s not planned to start for a little while yet, and I should probably implement the __gc to fix the memory leak before I forget all about it and wonder later why it’s leaking memory and none of the assets are ever being cleaned from memory.
-
I got a refurbished laptop so I could work on my game engine while not at my desk, threw debian on it, then ran into a strange issue where the same static libraries I used on my desktop running archlinux wouldn’t link on my laptop, so I took the opportunity to get started with docker, since docker works on my debian, couldn’t get it to work on my archlinux and couldn’t be bothered to try to get it working.
Also set up Jenkins running inside docker on my laptop, and started fiddling with that to try to get it to build.
Next steps are to make scripts/fine tune the docker to build the dependencies/libraries, then build the whole engine, and then set that all up in Jenkins.
Building for Linux should be good enough for now, then later I’ll set it up to build for windows too, then hopefully be able to transfer out the jobs/scripts from the jenkins I’m running now to a more permanent docker set up I hope to have.
(Hoping for a kubernetes cluster to run jenkins in docker for builds and testing. probably going to be with a few raspberry pis, haven’t bothered buying the hardware yet. only issue is then in addition to cross compiling for windows, it’ll have to cross compile from arm to x86_64, which may cause my scripts to need modifications.)I also hope to get automated build numbers set up with a x.x.buildnumber format from Jenkins, That should help for being able to release builds, and be a step further towards having basic engine polishy things going on even if the full functionality isn’t in yet.
Jenkins could also do unit testing or something like that, but I haven’t gotten around to writing any of those yet.On the 3d rendering front, it all compiles and runs without issue now, but nothing shows up. I believe this to be either due to not having lighting in yet so its all dark, or the camera somehow isn’t pointing the proper direction, I’m in the process of making bindings to move the camera around, and then possibly make a fullbright shader to render everything ignoring lighting, since I also don’t know if there’s an issue with how my renderstates work. I know the update thread and renderer thread are cycling through the render states like expected, but the 3d doesn’t show up and UI isn’t on the renderstates yet, so I may switch the UI to be in the renderstates to debug that, and also for consistency.
I also started work on developing the backstory/lore/worldbuilding for the first real game I plan to make in my engine. It’s mostly meant to be a game to test out the basic functionalities and sort of proof of concept that my engine works. I of course plan to have smaller games first to test some basic parts, but this is meant to be a game to test all features and expand to support newly added features, kind of as an engine demo.
No spoilers yet on the story, just that it’s planned to be an FPS since that will make camera work much easier, but can still support all the basic features planned in the main development releases planned so far. -
Not much to report in this week, mostly more work on getting the dependencies to build on the Jenkins/in the docker. I switched from using the declarative pipeline to the scripted pipeline in Jenkins because it let me do something I couldn’t figure out how to do in the declarative pipeline, which was to load a dockerfile from a sub-directory of a code repo I just downloaded. Somehow the
agent{ Dockerfile true}stuff from declarative doesn’t access the same workspace that the code was downloaded into in a previous stage, so now I use scripted and basically just do adef dockerimage = docker.image("...")or whatever it is, then I can do like adockerimage.inside(){ ...}thing to run commands inside of it, which gets me the functionality I want.A bit of rinse and repeating on trying to sort out all the dependencies for all the dependencies needed. There were a lot more than I expected to build some of the dependencies, Next steps is to finish up the Jenkins build to be able to build the final engine executable, then after that work on getting the docker to hopefully be able to cross compile to Windows. I’m a bit less hopeful after finding out how many dependencies my dependencies have, but if I can pull it off it’ll make dev much easier on me by being able to verify that the windows build still works without having to reboot to Windows.
Then after that I’ll probably get back to the rendering stuff at some point, just right now I’m motivated for the Jenkins and docker set up, and I’m learning it which is useful, I’ve used Jenkins and Docker for work, but never really had to write the jenkins scripts or configure the jobs, or write the Dockerfile myself.
Part of why I want to set up a kubernetes cluster on raspberry pis to be a build server is to learn more about containerization and that sort of thing, and learning React.js and maybe koa.js would help too. those are all pieces of things that we use at work, just I’m not fully up to speed on all of react, typescript, and all that webdev stuff we use. Got out of learning webdev when frameworks were becoming all the rage and changing like every time I turned around, just too much stuff to keep track of. Now that’s its settled down and we actually have some of that at work, I may as well learn it and maybe do some hobby experimenting with it so I can pick it up more easily if needed. Maybe I’ll make some sort of site for my engine at some point with it.
-
Still crunching away at the jenkins build, now running into some build issues which I know I’ve solved already on this project, so that’s making me lose steam on the project a little bit, debating going back to Godot to make some games/take a break from my engine for now just to help me be refreshed when I get back to my engine.
I’ve been thinking of trying to make a VR game, which will be faster to get to working on if I use Godot, since that’s already got all the pieces. Maybe next week I’ll have something there, or it’ll be back to the grind on jenkins/rendering for my game engine.
-
I managed to get a jenkins build to actually complete with artifacts get zipped and archived. And then I realized that by building it with a docker file based on the alpine image, it wouldn’t run on any of my computers because alpline is musl based, and my linux distros are all glibc based. So next fun thing is to switch my dockerfile over to be based off debian instead of alpine, and hopefully that’ll resolve that issue. Because of course getting it to all compile as expected would be too easy.
And of course this means having to figure out all the package names again for all the dependencies, but for debian this time. So that’s fun.Once that’s completed then it’ll be on to implementing version numbers to print out the version number from the engine itself, and then maybe I’ll get back to the rendering or work on getting the dockerfile to be able to build it all for windows, and set up the jenkins job for that.
-
I bring great tidings of screenshots, and descriptions of how fiddling with renderdoc helped me figure out my problem with rendering not working, the tldr was that my shader was borked, and the correct line was above the incorrect line of my shader, but commented out

So we’ll start from the beginning, nothing was rendering at all, but of course it’s a PBR renderer and there’s no lights, so I thought there might be an issue with there being no lights to light up my test cube in the scene. Also there was an issue with not knowing offhand which way my camera started facing, so I had to hack in some camera movement to turn the camera, which worked on paper, but still got me a blank screen.
First I’ll back up a bit and explain how the renderer works, since it’s part deferred, part forward, and all pain in the butt.
So the rendering happens in a few stages, first the deferred geometry gets rendered to frame buffers with the diffuse, normal, metalness, roughness, ao textures just being written as is to textures on the framebuffer. Then after the geometry is rendered like that, the framebuffer gets swapped out to render to the screen, and the framebuffer with the data is then read to calculate the lighting in a separate draw pass.
After that, anything transparent gets rendered using forward rendering, and then the UI stuff gets rendered on top of that.So looking in Renderdoc, we see here are the list of calls:
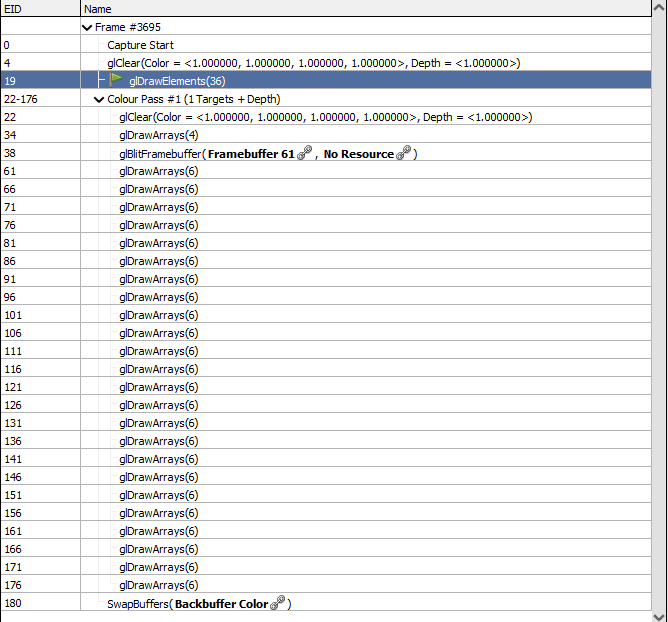
TheglDrawElements(36)is the call to draw my 3d cube, all thoseglDrawArrays(6)calls are drawing text on the screen for the fps counter (yes that is a lot of overhead for an fps counter ) And then that SwapBuffers is the end of the frame where it actually shows stuff on screen.
So that tells me that its actually trying to draw something on screen, so my renderstates stuff works! yay!
So then I looked further into Renderdoc, and me being me, I didn’t read a tutorial about it or anything, just started poking around, but the tab I found most useful was pipeline state and mesh viewer. First I looked at the pipeline state and saw this:
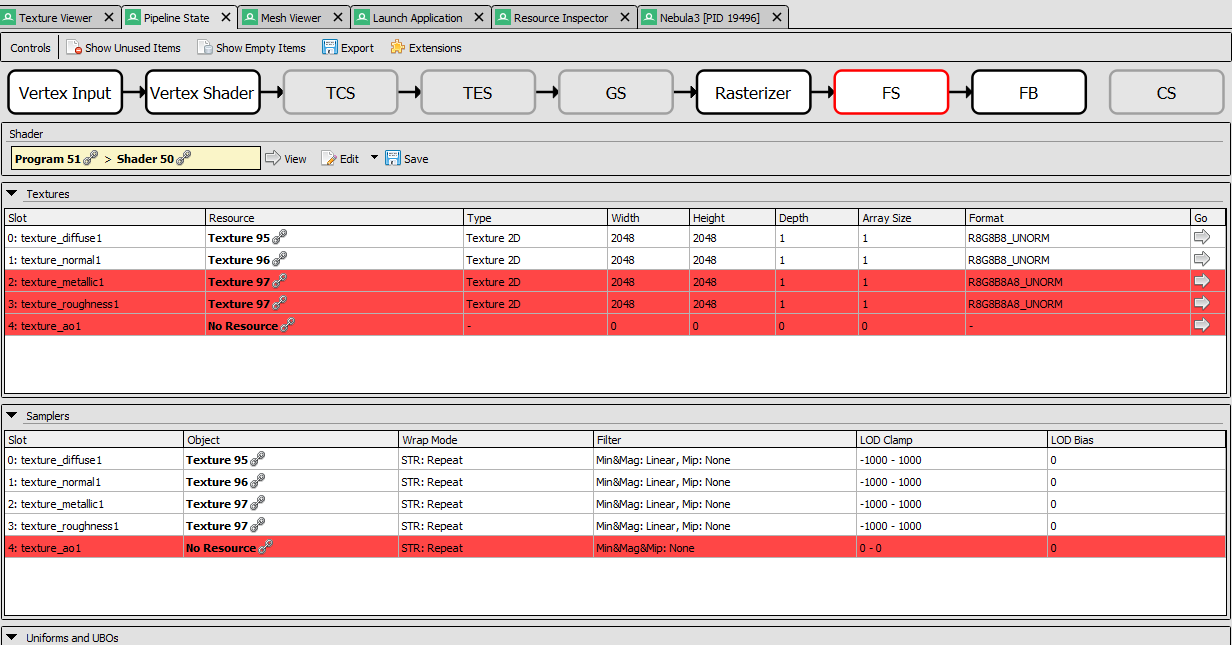
I knew that the ao texture didn’t have anything there, and I don’t expect that to cause issues, and I expected the metallic and roughness to be the same texture, but what I didn’t know/expect, was for them to show up as invalid textures.Lucky for me I had some logging information in my texture loading class that printed out the number of channels in a texture, and sure enough, the improper textures were single channel. The problem there lied in how I was setting up the
glTexImage2Dformat, I just needed to tweak the format and voila, that was resolved, but still no output.Next I went to the Mesh view and saw this:
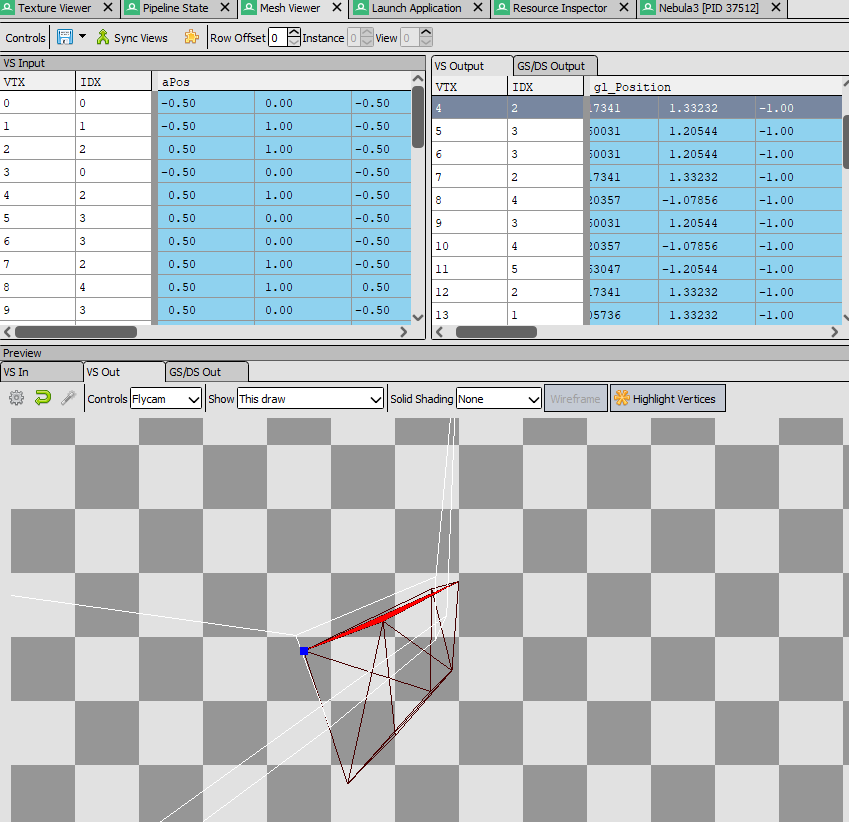
There are a few problems with this, first let’s look at thegl_Positionvalues.
gl_Positionis a vec4, that means it has x, y, z, and w parts to it, but here all the z values for all the points are-1that doesn’t seem right.
Also notice in the window below, the cube is there, but is behind the camera frustrum. That’s strange.
I did a whole bunch of debugging and random testing, moved the camera around and got it to be other z values than -1, but the mesh view still showed the cube as being behind the view frustum and it had a really weird distortion to the cube.
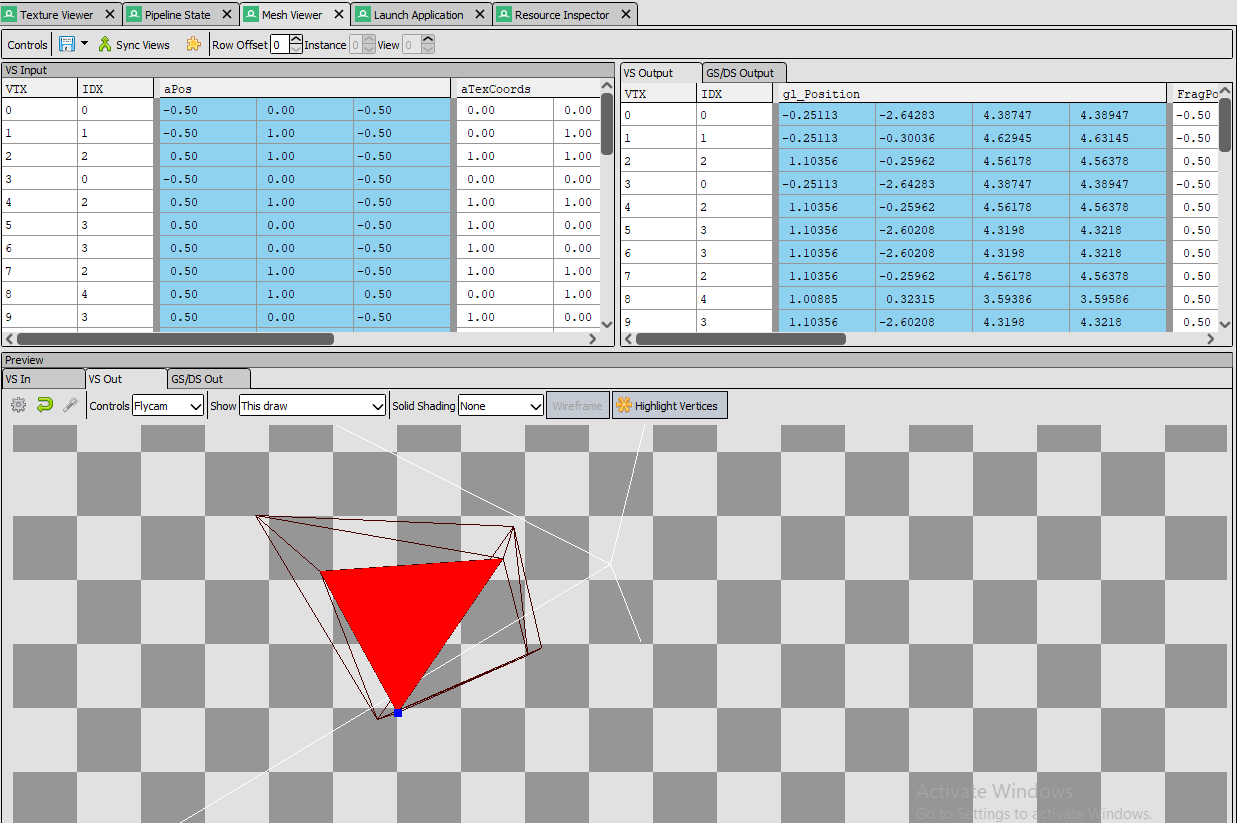
Then I checked my shader code and found this://#gl_Position = projection * view * worldPos; gl_Position = worldPos * view * projection;Now if you’re not familiar with matrix math, I’ve found the key thing to remember is that you have to do the operations “backwards” so instead of taking the object matrix, multiplying by the view matrix, then by the projection matrix, you have to take the projection matrix, and multiply it by the view matrix, then the object matrix. The order matters, and here I had the correct thing clearly written previously, and then commented out with the backwards order in its place.
Commenting out the incorrect line and uncommenting the correct line then gets me this result in renderdoc:
And this result in engine:
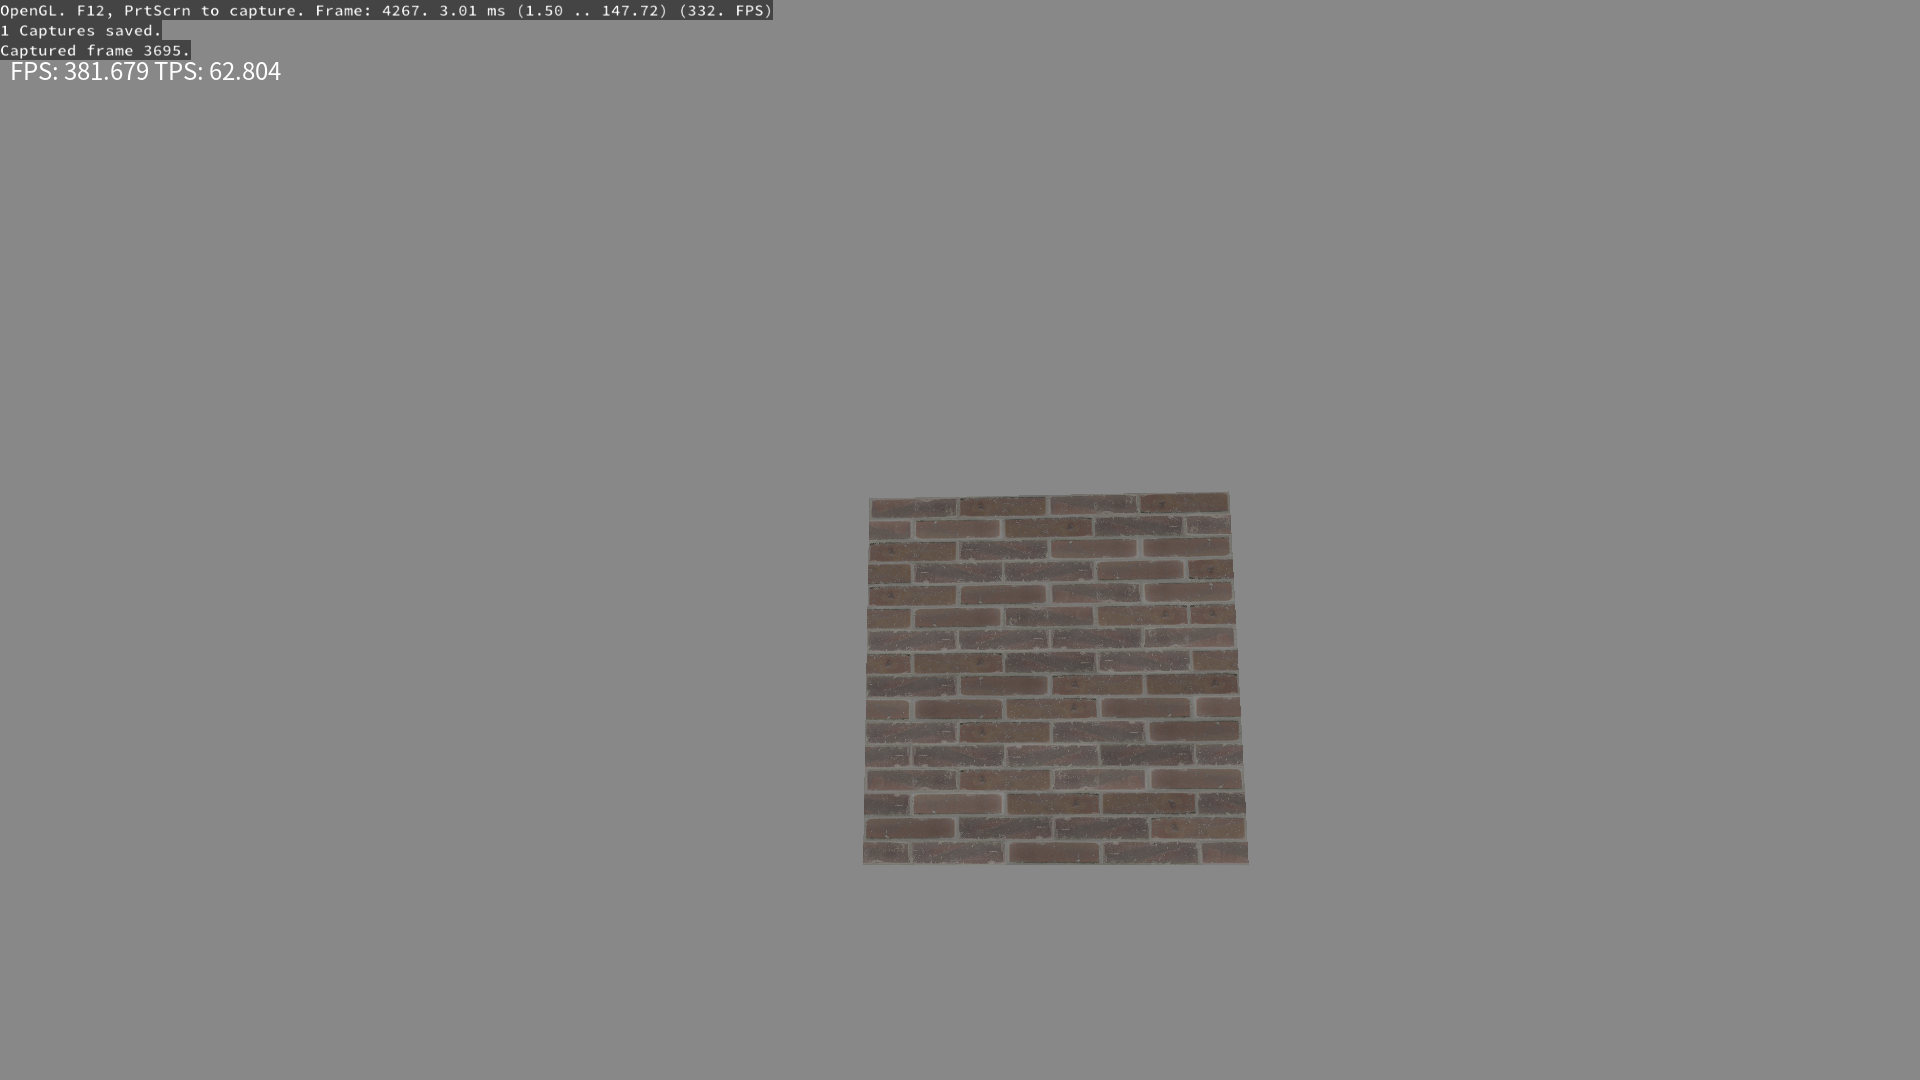
I don’t have the camera movement working perfectly, the mouse looks around wayyyy too fast, and I don’t have position movement set up yet, but soon I’ll hopefully have more to show off. and maybe I can get the camera turned around to default to look at the cube instead of away
-
Admittedly I don’t really have much new progress in terms of anything being completed, but I have started on a couple different items, one being build version numbers, including a version specified from Jenkins, the other being getting started on lighting.
For build versions I’m not entirely sure how I want to do it yet, I’ll probably have it be where a prefix is hardcoded in the repo (like 0.1.0.), that way each branch can have a different version number, and then append the jenkins job number and maybe a suffix depending on what kind of build it is (ie if its release/beta/debug/test/whatever, potentially with a different suffix if its a steam build or some special build like that.)
This method of having a prefix hardcoded in the repo does mean that I’ll need to remember to update it every time I bump the version number, either when I branch, update trunk, or when I tag a release, update trunk, but it is how we do it at my work currently and I don’t want to have to pass it into Jenkins, because I want the local builds to retain that number so you can tell what branch a local build was on.
The idea is that I’d get a version number from jenkins builds of prefix+job number+ suffix, like
1.1.0.799_betaor something like that, and then if I made a local build it’d be something like prefix+builduser+date+suffix like1.1.0.coder2021621_debugso you can tell what branch/version tag you’re at, as well as the build date and that its a debug build.
I haven’t yet decided on the suffixes but I’ll probably do that after I get the jenkins/CMake all set up to put in the build numbers.For the lighting work I’m planning to do a full PBR renderer, which means I’m now at the point of figuring out IBL (Image Based Lighting). I already have/had point lights implemented for my PBR renderer but no IBL yet, and apparently you need to have your lights have area in order to make it realistic, so I’m currently doing a ton of research on how to do all of this and I’m not even sure how to store the info needed for an area light, or what info is needed.
LearnOpenGL has a decent tutorial and sample code on getting started with IBL, however it only covers having a single global probe/HDRI environment map, which basically means you only get IBL from from the skybox. In order to make your environment look realistic with IBL, you need to set up local probes, which of course isn’t taught in that tutorial.
The basic process for local probes is to capture from all directions at an artist/level maker designated point, and then blend that with other probes and the environment map. Issues to this include: how often to update local probes, since dynamic objects will need them to be updated regularly, also how to actually pass the probes to the shader. I think I get in theory how to blend the probes together a little bit, basically by having an alpha in the local probes that cuts off at a certain distance, so where there’s alpha 1 you use local probe, alpha 0 use other probes. And then there’s some fancy business you can do with blending the probes, or just take the closest probe’s input.
Once I get IBL working with probes, it’ll basically put me at early UE 4 levels of lighting, I have realtime global illumination planned for later on, I’ve been debating if it’d be better to just do that and skip out on this probe nonsense but I am worried about how to handle things for lower end hardware, and it is my belief that I could pre-bake the local probes with non-dynamic objects and it may be acceptable for lower end hardware to simply not reflect dynamic objects, or just supplement with SSR (Screen Space Reflections) somehow, but of course that would probably involve more blending madness.
Also I’m nearing what I wanted for my 0.0.1 milestone, all that remains is engine build versioning, 3d lighting, some more editor console commands stuff, and scene saving/loading which I have yet to start. Once I get all the features implemented I’ll probably try to make some sort of simple game to test it all out since I haven’t tested half of it yet, I’m thinking breakout clone.
I did have a schedule planned for when I wanted the 0.0.1 milestone complete, which was like 3 months ago, but I pulled things into it from 0.0.2 milestone, like a lot of the 3d stuff got moved because it was more fun than other things, so I’m basically planning to just skip/ignore the schedule for now and go with the flow.
-
Well the version numbering is still in progress, decided that I’m going to just not put in a date as part of the number because getting a date in CMake seems painful.
Still trying to get Jenkins to be able to pull out the full build number from CMake and use that to name the zip file, that way I can keep track of the artifacts better.What I actually wanted to talk about is based on a discussion in the discord related to writing print on demand/ebooks. I’ve dabbled in writing since I was a kid, but I’ve never considered myself good and I’ve always been rather engineering brained, so I’m not going to talk about writing itself, instead I wanted to talk about writing toolchains, specifically the open source writing toolchains available. I’m well open to discussions on what you use or other writing/word processing tools that you use, definitely start up a convo on the discord, it should be a great time

Yes I’m going to software engineering-ify writing books by saying that you use a toolchain to write/publish them, This mostly came about after I saw that the book publishing/formating/whatever you want to call it software I thought would be good to use doesn’t support exporting ebooks, that software being Scribus. Apparently this is great for print media, it has color/printing features, defining trim/whatever, and it allows layout, but it doesn’t export to epub, it mostly seems to export to pdf, and while you can turn that into an ebook format it isn’t pretty and probably won’t be reflowable, which if it isn’t reflowable, it won’t fit easily onto a lot of different screen sizes.
So what do you use? Just libreoffice? I thought about that and it does seem to be an acceptable option, but I’ve already started writing my current writing project on my phone in markdown, doing some more research on the Scribus forums I found a tool that I’d heard of before but never used called Pandoc which apparently is like the holy grail of typesetting format conversion. It can’t go direct to Scribus’ format but it goes to ODT which scribus can import so its good enough for me.
So what does this mean for me? Well I can just keep chunking along on my project in markdown, then later when I’m done with my writing, I can easily chunk it into a ODT, set it up with covers/cover art, all the copyright stuff and other heavier formatting stuff like table of contents, whatever, and then convert that puppy to epub with pandoc again, or import to Scribus to make a print pdf. Or I could even try to set up the table of contents within the markdown, or I can convert my markdown to LaTeX and set up a toc in there. So many options.
So how does this become a toolchain? Well, you can define a process of how you want the flow of your project to get published, say you do most of it in markdown, ignoring most formatting/page breaks/what have you, then you can convert it to ODT to go to Scribus for making a print book, or just go right to epub for an ebook, or take a stop in ODT to do more visual formatting and then go to ebook.
Then the next logical step is to have a CI/CD system in place to automatically generate your book once a week based on your current draft and don’t forget the version control.
Okay okay maybe I’m going a bit overboard, but I did want to share Pandoc as being a useful typesetting/word processing tool, this sort of thing can be useful for more things than just writing fiction. School papers would probably have been way easier to focus on if I just did markdown or LaTeX first instead of having to use word, then converted it later, and I did my resume in LaTeX, with this I could update my resume by converting it to something else and do the formatting differently, or what have you.
That’s all for this couple of weeks, hopefully next time I can have some game engine progress, maybe the version numbers will be finished and maybe I can have some IBL progress.
-
It’s been a while, lots has happened, but not a lot on my project.
I’m on the process of gearing up to do the IBL changes, but there are just a lot of pieces so I’ve been a bit demotivated from my game engine.
However, today I added a second Texture class,
TextureFto handle floating point textures, which will allow loading HDR textures.
The idea being that you load a HDR equirectangular environment map, and then I’m working on some code to convert that to a cubemap. Once that is done, I do some processing on it and I’ll have a general environment map to do the IBL stuff with.Just following the tutorial part by part for now, but eventually I’ll need to go off tutorial and figure out how to blend that with some screen space, as well as local probes.
That won’t be fun.I’m going to focus for now on putting in the equirectangular to cubemap code, and then maybe making lua bindings, then chunk in the IBL stuff. Once the IBL stuff for the general environment map is in, I’ll probably take a break from IBL and implement scene exporting/loading so I can brush past local IBL probes for now and get to my 0.0.1 release without worrying about too much IBL stuff.
Gotta remind myself to do baby steps, and that I have a ton of other scope creep types of items that will possibly be more exciting to do.Speaking of the 0.0.1 release of my game engine, that’s supposed to be the point where I could prototype a breakout clone game using my engine.
It is supposed to have these things working:- Keyboard, Mouse, and maybe controller input
- 3D rendering
- 3D model loading
- Basic Lua Scripting
- UI buttons working
- text rendering
Basically enough stuff to have a “game” where you have a play button, hit the play button, and then you press keys on the keyboard to move something around on screen.
Right now what is left that I have planned on my Quire board for 0.0.1 are:
- 3D lighting
- Scene saving/loading
- Version numbering
So I’m basically there, and technically, if I really wanted, I could just push off all this stuff to later and make the breakout clone now, but I really want to get the basic IBL stuff finished at least for now so that I can have it behind me.
Also need to implement scene lighting in addition to the IBL so I need to figure out how to represent lights in the scene, and then render them.
I’ve done that lighting in the past but idk how to represent them in the scene, and I’m hoping to support spot lights, point lights, and potentially area lights. -
Alright I actually have some progress to mention now! Decided that instead of trying to keep a weekly cadence, I’d do better by matching my posting with when I have things to post about, and that way I can try to use this to help keep my progress momentum at times instead of as a weekly workitem/todo list task that needs to be completed, it can be instead a “Hey I did xyz and I’m excited about it” kind of thing.
So first: I split the 3D lighting bullet for my 0.0.1 release into multiple parts, I didn’t have any 3d point lighting or anything implemented yet, and was looking into IBL.
So I split the IBL out to 0.0.2, which was the pain part, and I"m working on representing 3d lighting data in the scene via ECS, as well as filtering out that data to the render thread when needed. And Lua bindings for adding that stuff to the scene.That all works, only issue is I think in shaders or something.
Behold what a point light looks like with the same cube I had before:
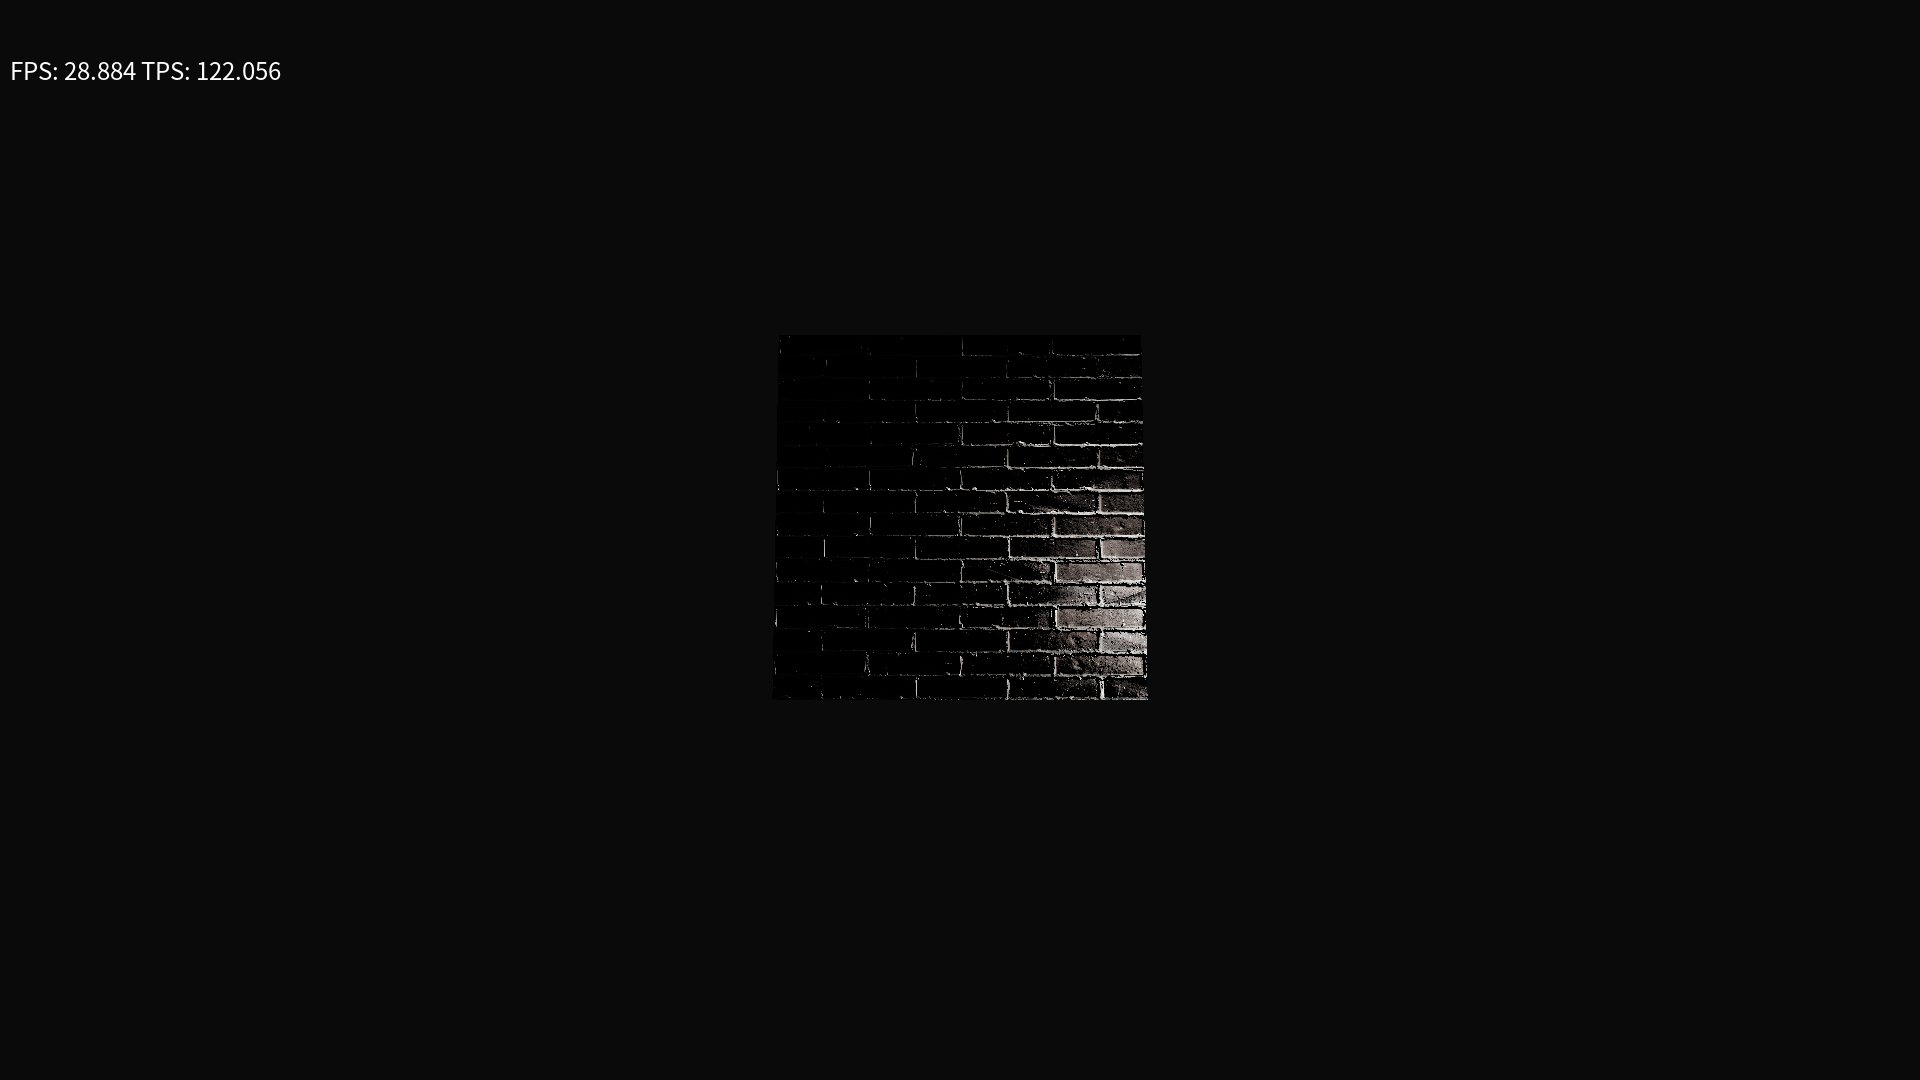
Notice anything strange going on here?
Let’s ignore the FPS: 28.884 part for now
It’s in black and white or something for some reason!Now I tested by having my shader output just “Diffuse” directly, so the diffuse texture is set up properly, so my guess is some issue with metallic, roughness, or normal shaders maybe? Not entirely sure.
I will say this would be a dope shader for a horror game, so I’m not entirely out of business here, but also I’m not convinced that the normal map is the right way round either.
Need to get renderdoc install on my Linux machine from the AUR so I can see the different textures, etc and try to figure out what’s going on. -
Gonna update here again since I fixed it:
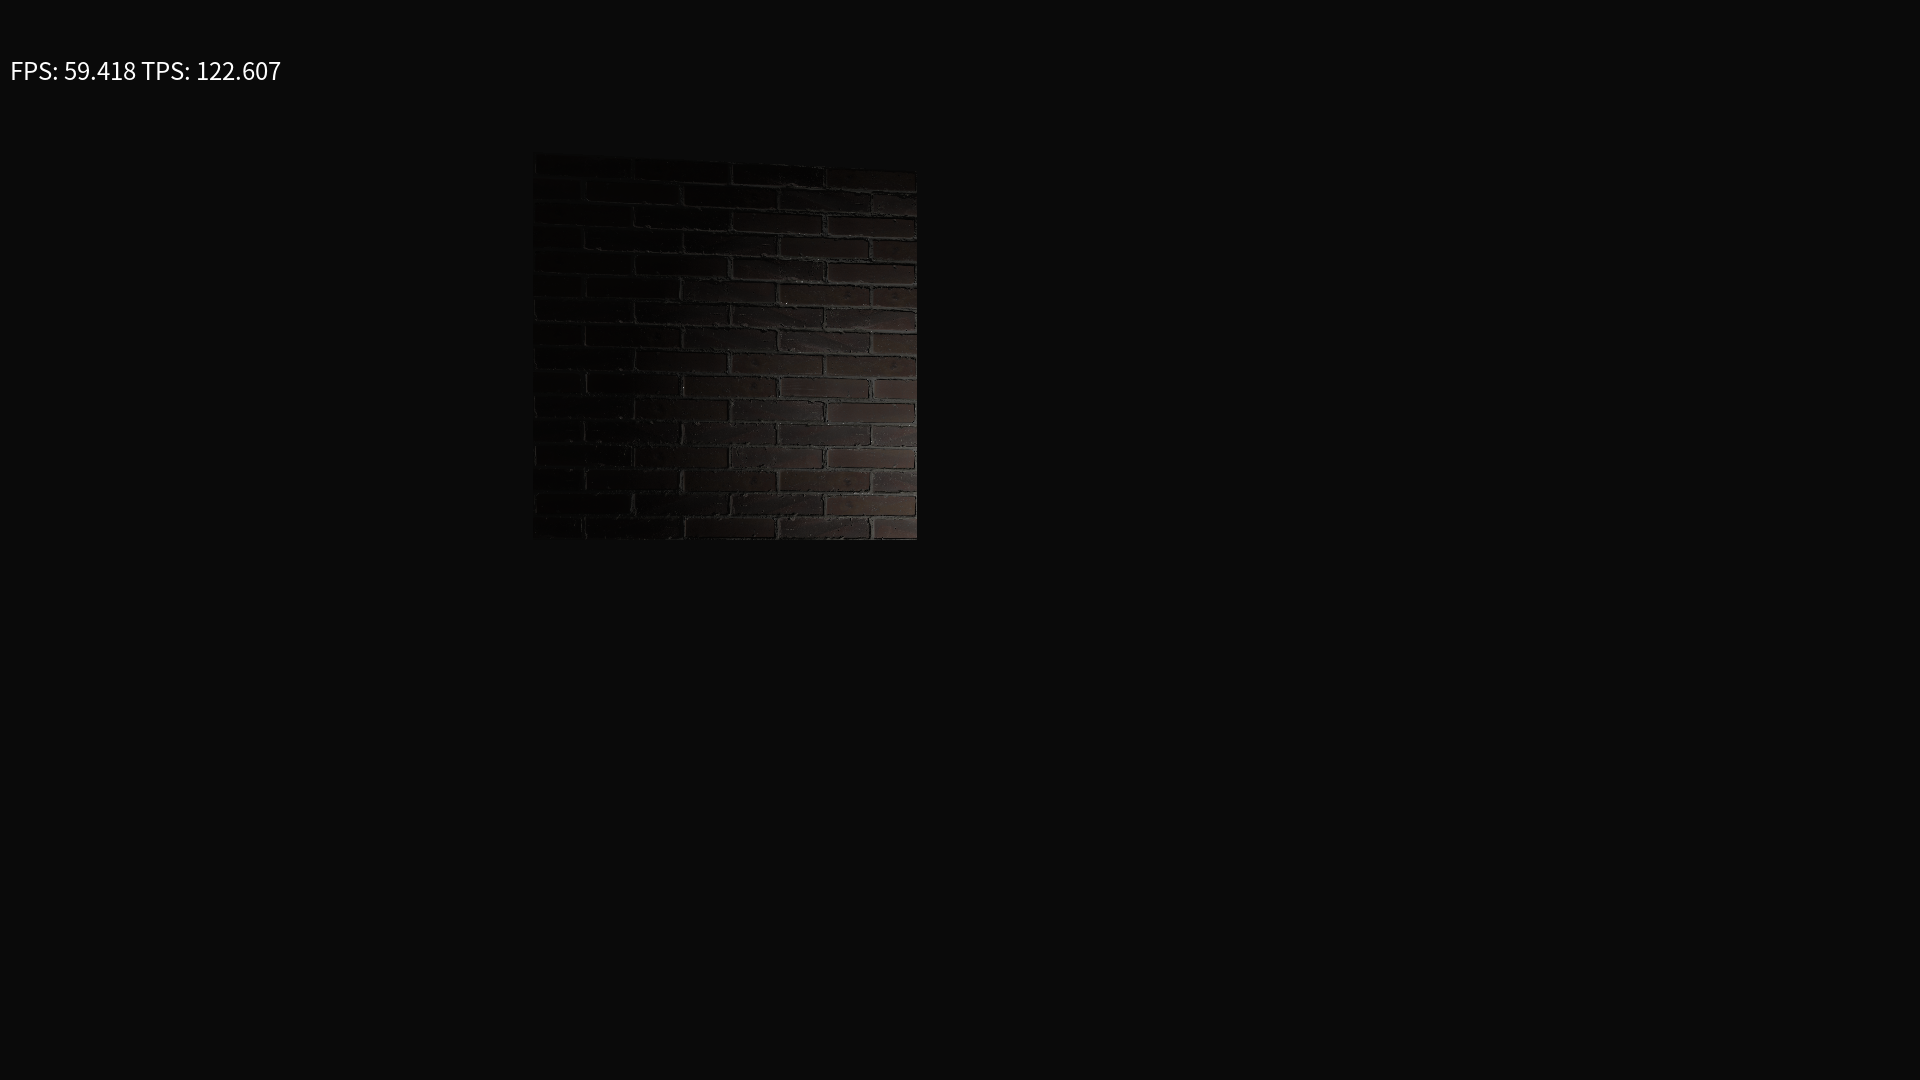
So the answer to the problem was in how I was transferring data between my update and render threads, I had used the shaders before without issue so I wasn’t sure how it was not working.
See I send data between threads via loading up a
RenderStatewith all the data needed to render meshes, etc. Well I added lights to that rather sloppily and forgot to add a line to clear out any lights added to the data, so the number of lights in theRenderStateincreased every frame, and apparently when you get hundreds to thousands of lights added in the same spot, it did that weird thing I was seeing before.Part of what tipped me off is also that after maybe a minute or less the FPS would start dropping to nearly zero, and I figured it had to be something that was increasing or something every frame, and sure enough it was this leak causing the FPS drops as well as the rendering issue.
Problem Solved!
Now I’m thinking I’ll put IBL off to a different release, so I split off that to a different story, as well as spotlights, I’m going to leave “3d lighting” at point lights and wrap this up, so only scene saving/loading and version numbering remain, version numbering is part finished and just needs some Jenkins love and it should be finished. So close to the first milestone I wanted!
-
Some progress on versioning but I don’t think its totally finished yet, still want to take the version number and put it into the filename of the zip file that Jenkins spits out.
But on the saving/loading scenes front I’ve gotten a bit of progress, I chose a json library to use to save things out to json and started writing code.
Not sure yet if I like how the code is shaping up, but right now it makes most sense to me to have separate code paths for each scene saving/loading format, however I’m not sure I like that I have the separate formats in the SceneLoader specific code itself, or if I should have split it off to a separate utility to handle the specifics and I just broke the pieces up into different parts, so I’m sort of split on that since I suspect I"ll need to do the same shit for serializing other things should I need to do that, so we’ll see how that goes.
I chose the Pico Json library for doing the json, it’s a single header file json library, so easy to integrate and the API doesn’t seem to be too much pain to use.
Basically I just use a
picojson::value()to refer to a value, and if I want that value to be a JSON object I just make it be astd::map<std::string, picojson::value>and if I want an array, its astd::vector<picojson::value>. This is nice because then I can just makemaps andvectors as normal and it works, only issue is constantly wrapping everything with thepicojson::valueand I don’t tend to do theusingC++ thing to use namespaces, so I type every littlestd::orpicojson::out, and that seems like it’ll get to be a lot of duplicate typing, since I’m basically looking at having each entity be one JSON object, with keys for each component in my ECS, and then each component is also a JSON object, which keys for its values, which are sometimes also JSON objects.And there’ll be arrays thrown in there in some places too

But yeah so that’s my progress, started on Scene Saving and chose a json library. now the boredom of typing out code to save/load every single component. and then I get to do that shit twice when I add the binary save/load.
Maybe I should get an intern. Or come up with a better way to serialize this stuff.
-
well I guess it’s about a week-ish since my last post, and for consistency I should probably post again.
Not much to talk about on the game engine front, been writing boring json saving/loading code as per usual.
But I started a new project! hopefully it won’t turn out like the last time I mentioned starting a new project in Godot and then stopped working on it pretty much that same week.
I’ve been playing a ton of Tales of the Neon Sea lately, got it free on Epic and boy is that a fun game. It’s got some very beautiful pixel art, and it’s a story based detective/mystery solving game, with all sorts of puzzles and such. it kind of reminds me of a point and click game, but it’s also a side-scroller, and has some really slick pixel art and pixel animations.
I don’t consider myself good at pixel art, I consider myself passable at it. But combine that with being reminded that pixel art in 3d with modern effects looks super cool, and being also passable at 3d modeling, I’m now in the process of throwing pixel art into 3d scenes in Godot and hoping it sticks.
This is one of those projects where I start diving into art first instead of any planning or story, which means its bound to die within a few eons, especially since I’m currently in the process of hand making normal maps for some of my tiles. Very tedious stuff, and I have no way of knowing if it’ll look cool or not.
On the front of making the pixel art go into 3d, I’m not entirely sure on the method I want to use, Godot does support just straight
Sprite3Dobjects, which is basically a 2d sprite rendered in 3d space, and they can be animated like 2d sprites, and have the option to be billboarded. However there’s also this pretty slick addon for Blender I found called Sprytile which is free. Sprytile isn’t like, always the easiest to use or the fastest most intuitive, but it does let you make 3d models with pixel perfect textures, either applying the textures onto a pre-made model, or making models with the textures, and it supports tilesets. so you can basically make a regular old tileset, and then map that into 3d.i’m hoping to combine that with hand drawn normal and roughness maps in Godot, to make some PBR-ish pixel art so I can do some cool 3d lighting and GI effects to hide the fact that my pixel art is bad.
So far I haven’t done much, but here’s a quick peek at what I’ve got with a mostly default Godot scene, and a couple Pixel art assets:
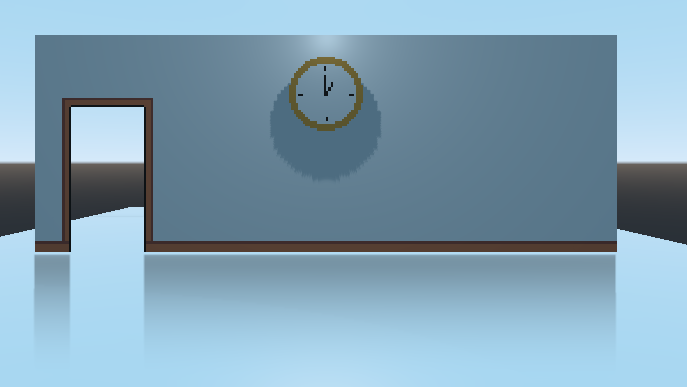
Both the pixel art assets areSprite3Dfor now, and the floor is just aCSGBoxfor now, with a very reflective surface on it to show off the SSR. I’d put some reflection probes in but I’ve found they are kind of shitty for a direct mirror finish like this and work better with more uneven surfaces.I think the plan for if I ever make a character for this is to make a 3d model and render it out as pixel art in Blender, but for now I’ll probably just use a box as the character and try to get some type of gameplay down. I’m hoping that with more of a point and click type interaction it should be simpler to do, maybe some side scrolling segments too, but hopefully I can get some kind of gameplay that consists of interacting with items, and maybe popping up panels to interact with for like, minigame type puzzles.
I think once I get a basic prototype with working gameplay, it’ll be easier to continue from there and come up with art and story once that’s there. That way hopefully instead of having scope creep from making a massive story and then burning myself out on having too many potential coding features, I’ll be able to go the other way, do the coding and add the features/puzzles or the ability to have puzzles and do interactions, and then I can do the story writing and actual game design stuff once I have features that sort of work, I think/hope that workflow will let me not get super burnt out, or at least I can call it quits sooner based on being bored of the mechanics themselves, instead of being bored of making art.
-
Right so I haven’t done much of anything on anything this past week, other than a few small things on the pixel art mystery game prototype.
I added a character who collides and moves the camera with him, and I added a single object that lets you interact with it, and it’ll run a custom script when interacted with.
But I also wanted to mention that I basically joined a game challenge for it: the Crunchless Challenge. Since of course, what’s better to do with your half-baked idea than to join a challenge and impose a deadline on yourself?
The idea of the challenge is that it’s not a competition with voting, ranking, or anything like that, its more of a personal challenge to plan out all the other things than just chunking out the game, so by the end of it, I should have a whole game made, polished, marketed, and up for sale on a store page, without any crunching.
Posting Devlogs counts as marketing as far as the game challenge is concerned, so maybe I’ll be a regular at gruedorfing for the next few months!
Also since its not a competition, there’s no hard start date, you can resurrect old projects, use code/assets/pieces you’ve made before, etc. it’s more of like a prompt to kind of get yourself going.
I think the main difficulty here of course is going to be similar to all game jams, limiting your scope. I basically have a whole list of features I want in this game idea, and I’m going to have to cut it down to a reasonable number, and then like, write the story. Deadline is the end of November to have it all completed, polished, marketed, and up for sale.
I think my current plan is to just have a small subset of the features/mechanics I want in for that, and then just release a single part or chapter of the longer story in November, that way I can fulfill the challenge, get a demo/story hook out, and then maybe get some testing time on the mechanics I do have before I add more.
In terms of pricing I’m thinking a pay what you want model for the first chapter, or completely free. the idea being that it hooks you in to want to buy the rest of it.
Of course I’d also need to write a hook or cliff hanger or overall story plot thing, and I need to find a setting, I’m split between just sci-fi or trying to do some sort of period/historical setting, since that also sounds fun. My guess is I’ll need to decide that before the challenge technically starts, which is at the beginning of November.
-
Yeah I decided not to do the mystery/detective/story based game for the crunchless challenge, because I’m not fast enough at writing to be able to write a story between now and november to implement.
So instead I decided to go with a dungeon crawler roguelike idea, basically inspired by Nethack and Ultima Underworld.
I figure if I can get world gen working then I can just make a crap ton of tiles and basic combat and boom there I go.Also decided to use Raylib for this project, which I’d never used before, and I accidentally slipped yesterday and basically got a whole main menu, character creation screens all done, and some basic character stat generation working, although I haven’t figured out how to have the RPG combat work yet so I might need to rehash that at some point.
Working on doing the map gen now, basically I plan for it to be done using Wang tiles, I would do herringbone wang tiles but having never done wang tiles before I think it’s better to start off with basic square tiles and go from there.
Here have some screenshots of what I got together after work yesterday:
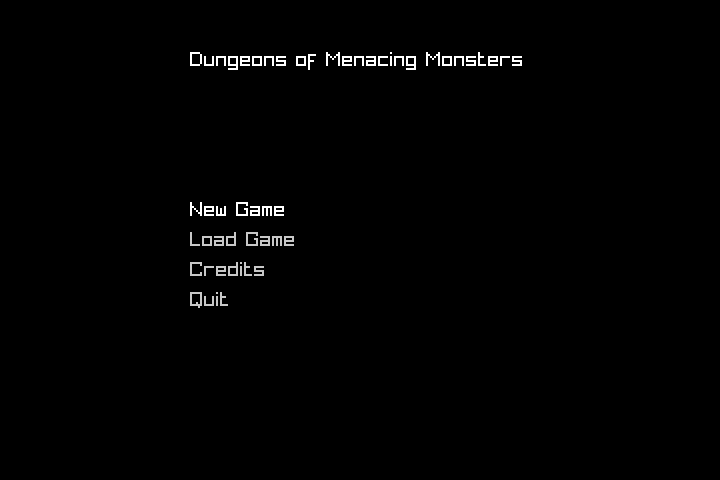
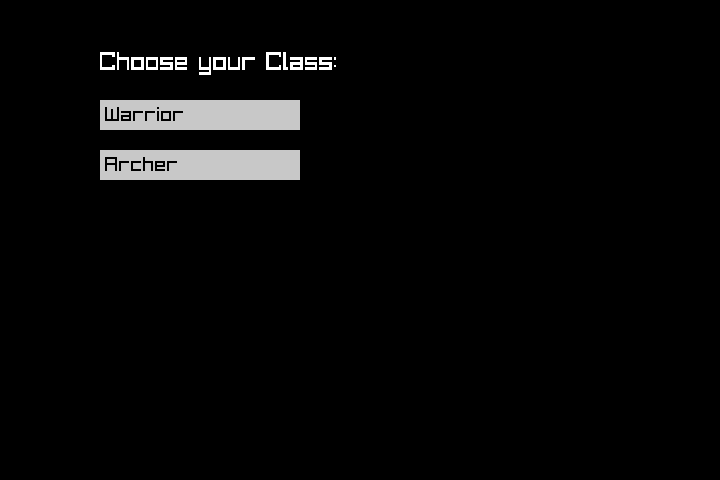
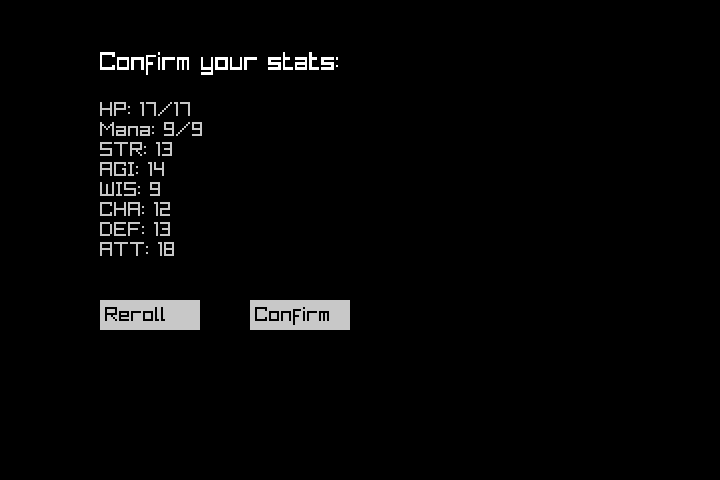
Maybe the only thing I need to update/change, is that the main menu uses keyboard input only to select the options, and everything else is mouse only, so I need to figure out how to allow both keyboard + mouse for everything, but tbh maybe going mouse for most things makes more sense.
-
I managed to get a type of procedural generation implemented using wang tiles, I’m using square wang tiles and representing everything in a grid based system, which lets me easily input tile data manually by filling out integer arrays. So I pre-fill a bunch of tiles, and then I have a separate array which holds the connectivity data for each tile, saying what sides are meant to connect to other tiles and where.
Using that data, I can generate reasonably okay looking maps, here’s a 5x5 wang map:
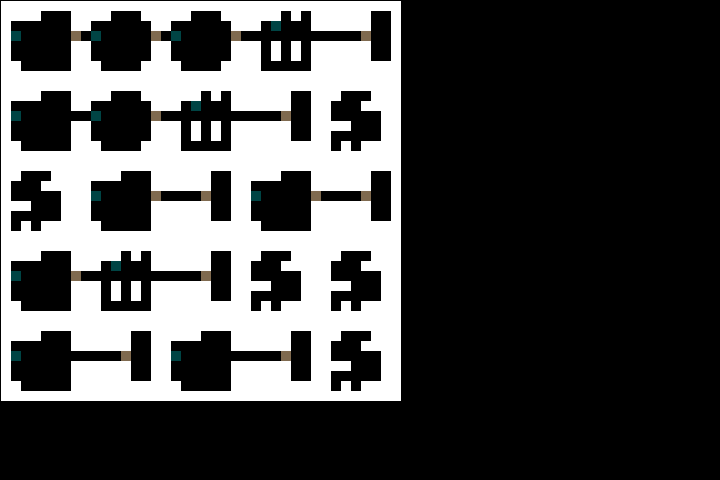
Basically I have it consider the edges of the map having blocked connectivity, then have it randomly select tiles from the set of pre-made tiles that will fit in that location. This is great for randomly generating a disjointed/disconnected map, and then I can also add some tile data for enemy, NPC, Item, door placement. In the picture above you can see brown squares where the doors would be, and a little blue square for where a potential stairway could be placed.
I haven’t figured out how to actually place the player spawn or stairway down yet, I hope for it to be like nethack, where you basically “spawn” at a stairway that goes up to the previous floor, and then you try to find the stairway going down to get to the next level, so ideally I’ll need a way to make sure that the spawn/upstair is connected to the downstair, so that it’s possible to actually make your way to the end of a level.
While I could implement some kind of wondrous pathfinding algorithm to do this, I don’t think that’s the best solution, definitely not the fastest and most bug free. I think instead since I already have it choose tiles based on the connectivity of the tiles that are already placed around it, maybe I could pre-define different connectivity maps for levels, so it could randomly choose a connectivity, and then it would know that any tiles that are defined in the predefined connectivity map as being connected are free real estate for being a possible stairway down or up.
The minor issue with this of course is having to make sure that all the tiles are also internally connected within themselves, which does limit the ability to have potentially interesting tiles, but I’m also thinking of potentially letting players just kind of, bash down the walls of the dungeon anyways, maybe with a pickaxe or a shovel or something. That seems like a solid way to help provide a way out in case the player gets stuck, and/or the map gen is half broken. Only issue is figuring out how to tell the player where to go, as well as how to keep them from escaping the map.
Okay and there’s also the issue of having to manually make multiple connectivity maps of multiple sizes, since I plan to be able to hopefully scale the floors to be bigger and bigger the farther down you get. Costs me no extra effort on my side to generate massive floors as long as it’s purely random generation with no manual connectivity maps.
Maybe instead of manually creating connectivity maps I just did a random walk for a bit instead? that would ensure some things are connected, would let me place tiles, and would mean less effort than manually creating the connectivity as well as allow for massive levels at no extra manual effort, and allow for more variety in map layouts than just the same 3-5 connectivities I would make manually. Plus it could totally wrap around on itself and have intersections if needed, but I’ve never done a random walk before and idk how well that would work to create a workable map, or how many steps it would need to have for different sized maps.
So that’s all sort of figured out, here’s what’s next:
- Figuring out classes
- Finalizing player stat generation for classes and generating starter inventories
- item using/management
- UI
- representing the 3d world
- combat
- I’ve never designed a turn based rpg and been satisfied with how the numbers are all used for combat, I’ve thought of looking into how GURPS and DnD do it, and then ripping them off, but I think that’s likely to run into licensing issues, and I worry it’ll be too similar to other GURPS or DnD based games. If you have any experience designing turn based RPGs and figuring out how to make numbers mean things, hit me up with ideas!
- coming up with some kind of macguffin goal to the whole thing
- seems like players won’t want to endlessly trudge through a dungeon, maybe having some purpose to go down there for, and then having to get back out or come back a different way would help add depth or something, but any likelihood of having a return trip would probably be stretch unless I can find a way to make the return trip fun again.
- finishing up map gen to generate enemies and items, entry and exit points
And some stretch goals:
- Shops
- I’m thinking similar to nethack possibly where items are laid out on the ground, you can pick them up and examine them, and then a shopkeeper stops you if you try to leave without paying, but items can be snuck out via teleportation or other ways, or the shopkeeper can just be disposed of.
- maybe some more story or something.
- pets maybe?
- in Nethack you start off with a pet, which is very useful because they will sometimes pick up items and drop them on their own, combine that with what I said above about shops in nethack, and yeah very useful to try to keep your pet alive if you can. Definitely try not to accidentally kill your pet, I’ve done that before.
- Deities?
- at this point it’s probably ripping off nethack too much and I may as well just crib nethack’s code and add 3d rendering on top of it, but hey it’s a classic for a reason.
Tune in next time for hopefully some kind of UI and/or seeing the world in 3D!
-
And consider the random walk method of improving connectivity and ensuring more of the map is connected to the rest working!
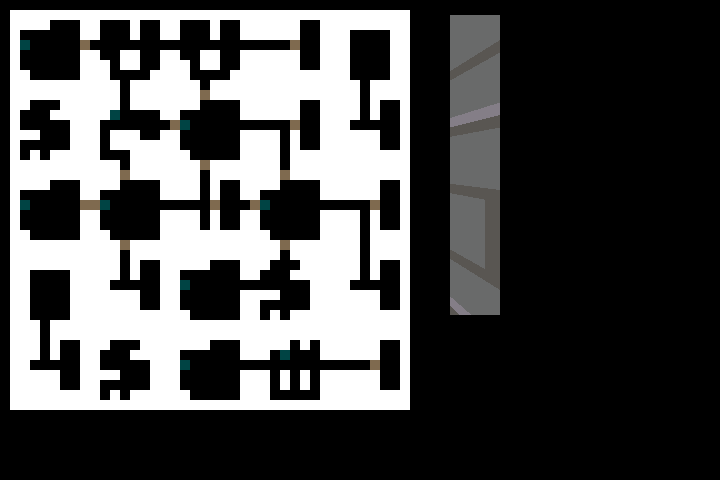
Much better connectivity and much better variety in terms of which direction the halls cross each other.
One caveat to this is that if no tile is found, then the default tile with no connections is used, that might be a problem since that can block off paths that may be wanted. Not sure if I want to make the default wang tile be completely connected or not, but that would prevent any blockages for sure, so then at least if spawn and stairway down are both on the random walk, then they will be connected.I also have 3d rendering working for floors/walls, but not really any of the other tile types.
Issue is that I haven’t done the player spawning yet, so you just spawn in the wall at 0,0, and can’t move out of there. -
Bout time for another update I think.
So I got the 3d movement and spawn/exit location picking working ish just after the last post, so now you can see what it’ll look like in game:
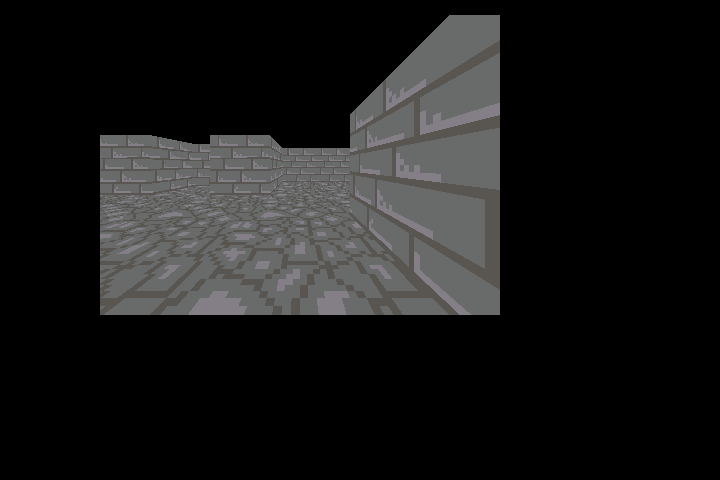
Yes movement works.
Then I also made the map look much better too with map zoom and scrolling buttons:
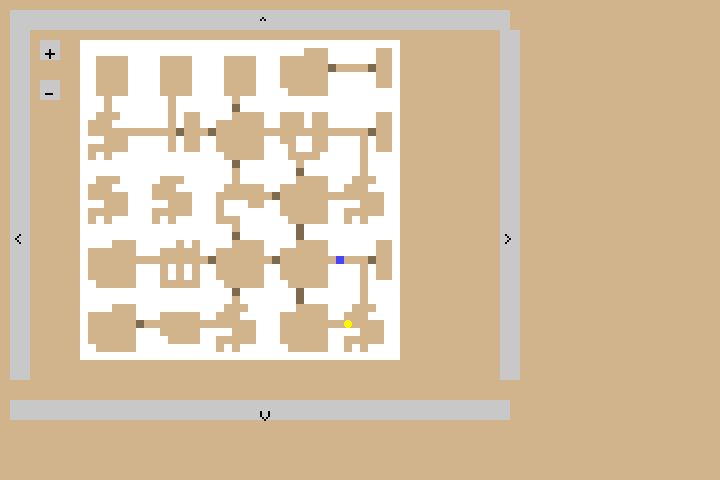
The reason I say the entry/exit location picking works-ish is because I’m not really satisfied with the location selection, basically right now it just chooses the tile, then loops through the tile to select the nearest “open” square, it does this because I didn’t bother to have it track which tiles have the spawn/exit values in them, so right now it’ll end up putting the player and the exit into the middle of a hallway.
You can see the player as the yellow circle on the above map, and the exit as the blue square.
I’ve thought about potentially having the map track/only update if you’ve seen an area, but that seems like potentially scope creep I don’t know that I care for, so I’ll probably look into that after I get enemies and combat working, since that’s like the next things required to make this actually be a game.
I think next time I’ll try to have more UI figured out, not sure I’ll do inventory, but at least the scrolling text showing what happened, or what is going on would be nice to have so I can potentially have debug printing in there instead of to console.
I may also see if I can set up a jenkins job to build this as well, since I already have a jenkins semi-working on my laptop, it has bad uptime, but if it works to build Linux, no problems there, then I might take a break from dev on this project to work on making a docker image to build windows builds from linux, which would be helpful so I can just press buttons to get both builds of this project. Since I plan on chunking this project out commercially prior to finishing up my game engine project.