Coolcoder360's Devlog/updates thread
-
Engine progress
Not much to speak of this time, still slogging through the lua bindings for the UI stuff. I now have it so I can do all the same things before you saw for showing a window, but in lua scripts now.
Still no widgets or anything like that but at least now I have somewhat parity between the C++ and the Lua bindings.Next I think is implementing lua bindings to do the Rows, which are basically to hold each row of ui elements in the window, and then I’ll need to add the C++ and lua to handle any actual input widgets or labels or progress bars and other such things.
Don’t remember if I’ve explain it before so I’ll explain it again, basically the way Nuklear seems to work, based on my possibly limited understanding, is you essentially have a “window” which is essentially a bucket that is a separate window in the UI, you can configure it to be closable, movable, minimizable, resizable, etc.
Then in that Window you have the widgets, but they’re laid out or organized in rows. how exactly they are laid in rows can be changed based on how you want to layout the gui, but basically what I’m planning to do is to have a Window object that just holds Rows, then have the Rows actually hold the UI components themselves. that way I can programmatically generate the full window and specify layout in lua, and all that happens is my UI Manager calls draw on the window, the window calls the nuklear methods to set up the window, then calls draw on its rows, and then each row does the call to set up the layout, and then calls draw on its widgets, which then just does the nuklear calls to set up the actual widgets (and will then get the input results from Nuklear and then ping back into the configured lua script/method with the input from the widget)
Engine testing
I was reading a factorio blog post recently and they mentioned doing automated end to end testing, so I thought it would be good to think about how that could be done, perhaps there are some other frameworks or something that could be used.
I do think that basically having a way to provide fake input to the engine would be easy enough by just adding some stuff to the input manager, to allow triggering input actions outside of needing glfw to actually register the events. I haven’t fully fleshed out the details of what kind of scripts the tests would be written as, but I think it would be helpful to start at least figuring out what engine modifications might be helpful to doing automated tests.
Things like being able to run in a headless mode, that way you can avoid needing to use GPU and still be able to run multiple tests in parallel on the machine.
Maybe having some sort of “on demand” rendering to allow taking screenshots when needed but otherwise just don’t render anything? I’m trying to figure out how useful automated tests would be for testing actual gameplay vs testing just general engine features to ensure there are no regressions, and I suspect taking screenshots may not be the most useful, because I could imagine that the graphic quality would vary a lot at least while a game is being worked on, but maybe if there was a consistent test case for the engine to verify that the graphics rendering seemed to match at least somewhat closely between different renderers?
Additionally, It might be worth being able to capture state/save the entity/component state to compare, then comparisons of state could be done possibly between specific entities that are having functionality tested on, and it would work regardless of the graphics changing.
So those are some thoughts I had about potential features that might need to be added to facilitate writing automated tests, so hopefully then during development of a game, I could set up some automated tests for that game to test some functionality, maybe to verify that the main menu, pause menu, options menu all work and don’t crash, and then I could maybe add them to all run in Jenkins to be automated like once a week or month.
Next steps
Moving next week to a new place. lots of stuff going on for that, and not so much game engine progress expected. But once we get the place set up I’ll probably be right back at it trying to get my UI stuff figured out so I can get the editor on track. Once the editor is on track I’m hopeful I could start making some real games perhaps, even without fully workable physics or audio.
-
New place
Took a bit longer to complete the move and get my desktop set up than expected, but had an unexpected funeral and road closure keeping me in a different state, so the one week I expected to not have any progress turned into 3 weeks.
Still trying to set up my office, need to set up the 3d printer and better route the ethernet cable from the kitchen on the first floor to my office in the basement. I got a 500ft spool of bulk ethernet cable to be able to route that around everything along the walls, and was going to 3d print brackets to hold it in place.
In order to better route the ethernet cable I’m designing some brackets to use to mount it to the wall so I can 3d print them off, figure since I’ve got a house now I may as well make use of the 3d printer to make things.
The bracket is basically just a half circle with a little hole for a nail to go through:

but I made it parametric in FreeCAD so I can change the size of the hole to fit different nails or screws, and the size of the arc to fit different size cables, or the thickness or overlap of the parts to make it more sturdy if needed. Learning FreeCAD has been good, and I think it might help if I wanted to make furniture or other things that may not be 3d printed, but require good design/planning ahead to make sure everything fits together. Blender is nice for 3d but not sure it’s really parametric in the ways I need to make physical objects.Game Engine
The status on the game engine is pretty same-y same-y, still doing UI Lua bindings and stuff to try to get it to where I can at least add a single widget to a row and add that to a window.
Once I’m that far implementing other widgets shouldn’t be too bad since Nuklear pretty much pre-cans all the hard parts, so I’m hoping it should be smoother at that point, then once I’ve got a few widgets in I should be able to get some sort of editor UI going and then hopefully from there it’s a simple verifying the model loading stuff was ported properly, maybe dress it up a bit to make it easier to fit into the current framework of how meshes work, and then I should be set for the basics of things.Then I’ll tackle animation, physics, audio, etc in some future milestone, but I could feasibly start making levels/logic/something once the UI/model loading stuff is in. UI styling might need to be done at some point to make it not look awful, but that’s a longer distance worry for now I think.
-
Engine Update
Been in a little bit of a rut with the engine where I just have a slog of things left to write, make bindings for, etc for the UI stuff.
So I haven’t been super excited to work on the engine between that and all the other crap going on, so I figured it may make sense to start a side project to do something to still do coding/crap but make it so I can come back to the engine with a fresh mind, like how I worked on that dungeon crawler ages ago for a few months.Effectively nothing has been finished since last time other than making a Label class and lua bindings for it, and filling out the implementation using nuklear, but not testing it. Now I’m trying to do a button but not really excited about it.
New Side Project
So the new side project I decided to do literally 1 minute prior to writing this, basically I was just on my computer clicking around the browser windows as one does when supposed to be doing real work instead, and saw a GOG window that I had left open on the main store page, with a sliver of a screenshot of a game called Hero’s Hour on it. (not sure why that link looks like xn–<name>-nw6e to me but maybe that’s a preview only bug?
Opened it up and I saw the graphics and I thought to myself “making a little top down world map view RPG might be neat, maybe jrpg, maybe not, not sure. let’s open Godot” and so a game idea was born. that is currently only maybe 5 minutes old and will probably die about 5 hours from now.
Anyway figured I’d stop losing for that update, will try to write again next week on how long that new game idea survived.
-
Side project progress
Going to jump right to the side project, nothing to report for the engine
Art
I’ve got a tileset I’ve been working on, forgot how fun it is to make a pixel art tileset:
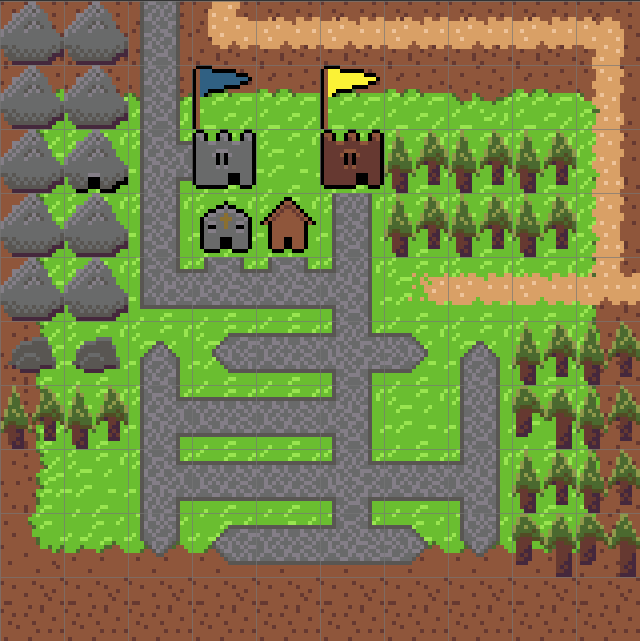
The tileset has grass, dirt, sand, dirt/sand path, and paved path, trees, various buildings, and some mountains. It’s meant to have some tiles be on a layer over the top of the base ground layer, which may make the mapping a little bit complicated, but shouldn’t be too horrid.I think I’m going for more of a jrpg type thing, or maybe sort of like a roguelike, I’m definitely leaning towards using some proc gen (discussed below) for creating maps/overworld, etc, and I’m thinking turn based will be best.
I’m also not aiming to have different heights/levels in the map, that’s just too complicated art wise and mapping wise, but I’m sure it can be faked with setting up tiles in a certain way.
Tech
So I’m planning on using proc gen to generate the map, instead of manually placing tiles, that’s nice because then I can use it to create:
- Replayability, you can play the same game multiple times with different layout, different world, and different experiences
- Larger worlds than I care to make manually, which is great because making large world maps, or lots of small interiors sounds like it could get very tedious, so this way I can make a larger world with more crap to do, without spending too much time on all the individual crap, I just make a tool that makes each type of crap and then another tool to tell the crap where to be crapped out at.
I plan to do at least some of this proc gen, for the world map at least, using Wave Function Collapse. You can see one sample implementation and what it does here but I’m planning to make my own implementation in GDScript (for now, maybe I’ll figure out GDNative later if that’s too slow) so that I can understand it, and potentially tweak it if needed.
The gist of wave function collapse (WFC) as was described in one of the several videos I watched on it, is that basically it’s like solving a Sudoku puzzle, you start with a few pre-chosen tiles, either randomly chosen or given to you, and then you go through all the other slots and you can narrow down the options remaining of what value/tile can go there, until either you get to only one possible tile, or as few as can be, then you just randomly choose on from the options that can be there at that tile, and then you update the rest of the slots with the options remaining.
The way you know what tiles can go next to each other is by defining the possible adjacent tiles to each tile, which if you look at the above github repo, can be done by providing a sample or “training” tilemap/texture, which let’s the algorithm know how/where to put different tiles in relation to each other.
One thing to note about WFC is that it is all based on local connectivity, how each individual tile connects to its neighbors, there is not really any stored/saved data about bigger picture things, which means you can very easily end up trying to make a generator to give you square rooms, but wind up getting non-square rooms, or other similar issues, simply because the WFC algorithm doesn’t really have any data on the inside vs outside of the room. This kind of difficulty can be solved though, by including a sample tilemap that uses a different tile for the interiors of each room, compared to the exteriors, that will keep the room interiors internal to the room and prevent the room from sprawling on.
How is WFC different from Wang Tiles?
Wang tiles are something I’ve done in the past and I think mentioned somewhere upwards on this chain, and I wanted to kind of mention how they seem similar at least in theory to WFC. WFC you define the possible adjacent tiles and try to pick a tile that can go in a spot that is adjacent to the others, based on edge connectivity.
In theory, you could probably combine WFC with Wang tiles and be totally fine, so what’s the difference between what I’m trying to do now and what I did before?
Previously, I did Wang tiles, which the ones I used were basically large blocks that were made up of many smaller tiles/pieces, in this case I’m trying to do WFC on those smaller pieces instead of having to make the tiles, and then manually create rooms/chunks with those tiles, I can just focus on making the little tiles, then piece them all together in an example map, and then let WFC do its thing from there.
Another difference between what I did earlier and what I"m doing now, is that previously I did not propagate any possible options through the map when generating a map, instead I defined the edges of my confined/finite map as being closed off, then randomly chose tiles to fit with that, and make sure that the connectivity of any other already placed tiles fit in with the connectivity of the tile chosen. Is there a reason you need to keep track of and propagate the possible tiles instead of just picking from pre-computed connectivity lists where you group all tiles with specific connectivities together? Not as far as I can tell, in fact I think having to propagate your options through would be slower computation wise, however, this lets you go through and find the tile with the lowest number of possible choices, and fill that in and propagate from there, so hopefully (and this is hopefully, I suspect it’s still possible) there will be fewer instances of the algorithm running itself into a corner where no tile exists that can fill a spot, which happened multiple times when doing Wang tiles, but meant in order to get more generation to work, I had to spend a ton of time manually creating new wang tiles to fill the connectivity combinations that I didn’t create yet, or deal with having a 4 way intersection wedged in there to not block off any paths.
I will say that doing the wang tiles I did before did mean I could just do random walk to make sure you could get from point A to point B by pre-defining the necessary connectivity without defining tiles for those slots yet, which let me create a traversable level from start to finish, but here for an overworld I think it should be possible to not run into too many cases where something would be untraversable, or if anything I can pre-define some parts of the overworld to make sure that things are traversable, but then just proc gen the rest.
Also in theory, with WFC I could make an infinitely generated overworld, and then generate each individual place on the fly. Which, that would be great and all but if I want like a classic story, and maybe some sort of sane leveling system, it may make sense to limit things a little bit to prevent things from getting too insane, although I’m not going to rule out quest and story proc gen just yet, but I think for a better experience for a jrpg type game, some intentional design is important instead of just letting proc gen go completely rampant.
Side quests though, that’s probably where I’ll let proc gen go because if the system generates towns/buildings/whatever, then the system can fill those with stuff, I’m not going to hand make everything that is like that. Proc gen for weapons, tools, items etc will probably also be useful.
Next Steps
Next steps on this project, I think getting the WFC actually working. I’ve rambled on about this, but so far I have a file in Godot that doesn’t do much, it stores out the adjacent tiles from a pre-canned 2d array so it knows how to connect things, but it hasn’t figured out how to use that to create anything just yet, and the propagation of options/narrowing down the options is going to be a little bit intense.
So far I’ve been enjoying making the tileset so that’s good, may make some sort of at least placeholder character for now, or maybe go through and make some items or ui features for later.
After the WFC generates the array of possibilities I think it’ll be a matter of getting it to create the TileMap and then putting that for someone to see, then making it so you can walk around in there, have collision, etc.
-
Side Project progress
I decided to spend more time making art instead of getting the proc gen all figured out, so I also made some item art:

Basically went a little bit overboard making random items, trying to have a variety of variants for each item. I do get that I could just do palette swapping or other shader tactics to get different colors, but I decided not to do that for now, this way all color variants are strictly using the dawnbringer 32 palette.
I also did some additional outdoor tileset art, but not much new since last post.
Proc gen
Not much progress to report on the proc gen front this time, trying to wrap my head around how to actually do the logic, it seems like it will be much slowly to generate than the wang tiles just because there are a lot of arbitrary things like “find the cell in the tilemap with the least amount of possible tiles” and stuff like that, which look like it’ll be a mess of looping through things, which is just making the generation time look insane.
I may mitigate some of that by trying to store a list of all the cells that haven’t had a tile put in yet, at least to prevent having to loop through all XxY cells in the tilemap for every iteration through, and instead just pick from the ones remaining. I’m trying not to think of the big o of whatever the result I end up with will be.
other stuff
I’ve tossed the idea around a little bit too of trying to learn Rust in some way, but not really wanting to add yet another side project, so I’ve been putting that off for now, but I may wind up pausing this side project for that side project, or similar, not really trying to write two engines, one in C++ and one in Rust, but maybe if I used the Rust engine to target DOS or something else like that? Who knows.
That’s all for now.
-
And back to the Engine!
Got back to doing UI work on my engine, labels and buttons are now possible to be put into windows. They do overlap in the screenshot here, but I’m not sure I care for now, it’s working!
And the button even works (just logging stuff for now when pressed, but still, that’s progress!)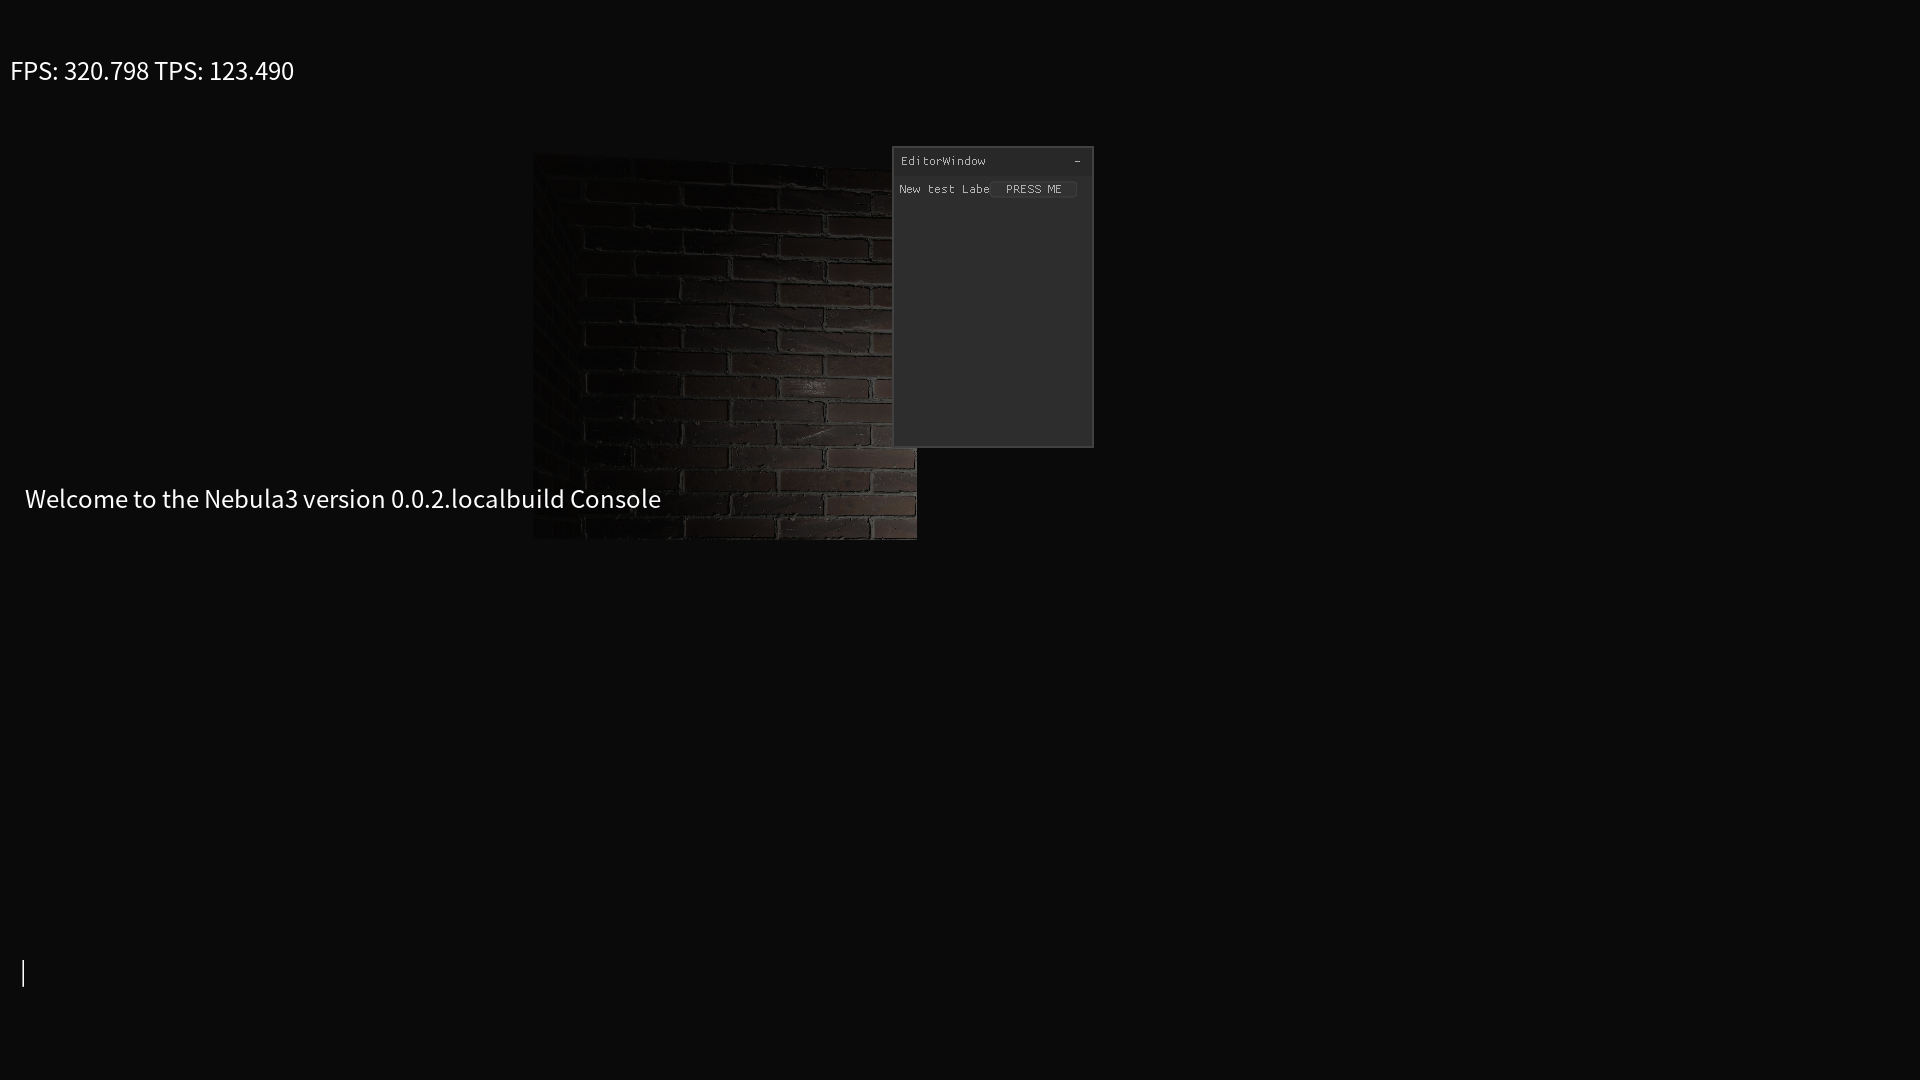
However there are cases now where I’ve noticed some odd/unreliable segfaulting, some involving EnTT type assertions and such, so I’m a little bit concerned about the reliability/stability. Again. But progress has been made. And good progress at that, I mean what more do you need for an editor than buttons and labels? Okay Text Input is a good next thing, and then checkboxes and radio buttons are probably also going to be on the list, maybe sliders too. But baby steps for now.
Other side projects
In other news I’ve started a little Rust project with SDL2 just for like, learning Rust and such.
I’ve also started making a Pixel Font.
And I’m still doing pixel art for my Godot jrpg procedural map generation side project.
Next steps
I think next steps are going to be
- Add text input boxes
- Add checkboxes
- add radio buttons
- try to fix up the reliability a little bit to make it more reliable
That’s all for now!
-
So I had my brother-in-law visiting for the past couple weeks, and he’s young and excited about game making, so I did what everyone does. started a new project with him to work on.
Just a godot project, don’t really have much on it to be honest, but maybe it’ll get there, that or it’ll just sit as another unfinished project.
Him being over distracted me from most of my other projects.Engine progress has been pretty quiet.
I do however have quite the development at work, so I’m going to need to step up my note taking and organizing game. I prefer to handwrite my notes on paper, since that helps me both to remember what I wrote, and let’s me take notes off to the side while I’m presenting, sharing, or typing something else on my computer.
This does mean a couple things though:
- My notes aren’t easy to search or sort
- my handwriting is horrendous, so being able to read my own writing is sometimes difficult, or nigh impossible
- if I want to convert it to text, then most standard out of box OCR things I would expect to not work very well.
I did look into something I’d heard of a bit called Rocketbook, as this looks to be the least expensive type of “smart notebook” starting at only about $34, and you get a notebook with sheets that can be erased with water as long as you use the special pens.
The issue, is their app’s OCR involves sending the scans to their servers, which in my mind is kind of a no-go. I want something that I know doesn’t create any type of security/privacy issue with what I’m working on, and will let me potentially use the solution for both work and for non-work things.So basically I started a new project to train some ML models to do OCR on my handwriting. I took a intro to machine learning/AI class a long long time ago, and I’ve dabbled about with tensorflow in a past so it’s not all super new to me, but OCR is a somewhat complex topic and has multiple moving parts, so I’m following along with a couple of tutorials.
The gist of it is that you have to do two things (typically with two different models)
- Detect where the text is
- this usually spits out a bounding rectangle of each chunk of text in the image so that it can send a cropped image of just the text to the second model
- recognize what each chunk of text actually is
- this is what does the actual handwriting
There are actually pre-trained models you can find to do both steps, in fact there’s already a project using said models on Android to do the recognition completely on a phone, however those models are trained on computer printed/generated text, not handwriting, so I doubt they will be very accurate.
So my plan is to basically find models to do those things, and then create some sample writing data myself, so that I can train the models on my own writing instead of someone else’s. This is good because sometimes my words turn into squiggles when going quickly, so if I can write crap out, and then type it out so I know what it says, then feed it to the model, in theory I should be able to get some semblance of a working OCR model off my own handwriting.I would need to likely find and train a detection model, and a recognition model. I plan to do that on desktop using python + jupyter lab (an in browser python editor/tool which is fairly nifty for data processing and can display matplotlib graphs and charts inline with the code blocks)
After that I need to convert each model to a tensorflow lite model that can be loaded by an Android app to run the models on a phone, so I could basically make an app to take a picture of a piece of paper or notebook page, and then turn it all into text.
I also haven’t decided what should happen for the images, I do sometimes have diagrams, and formatting is also a fun challenge, so I may have the app take the images and save them separate from the text, and/or I might have the images get put into a PDF along with the OCRed text data.
For now I’m following along with this tutorial. it seems fairly in depth on how to do things with explaining the code as you go, and is an easy format to just copy/paste into a jupyter notebook. This is just the handwriting recognition portion, and not the detection portion though, so I will likely need to figure out how to locate the text in the picture/page with a different model.
I’ve been eyeing a model called EAST for that, it seems more aimed at detecting text in the world and not on a page, but really I think that will just improve the robustness of the model for what I want.So I guess it’s off to collecting a few thousand word/writing samples from myself to train this puppy on, tune in next time to see how long this project lasted!
-
More non-engine stuff
Okay I get it, I get distracted a lot. but this time I installed a new distro, and started another project(s).
New distro installed
I got bored with Debian, and remembered I left like 1500GB on one of my hard drives to install other distros, so i installed the Garuda with i3wm. I think it looks pretty slick:
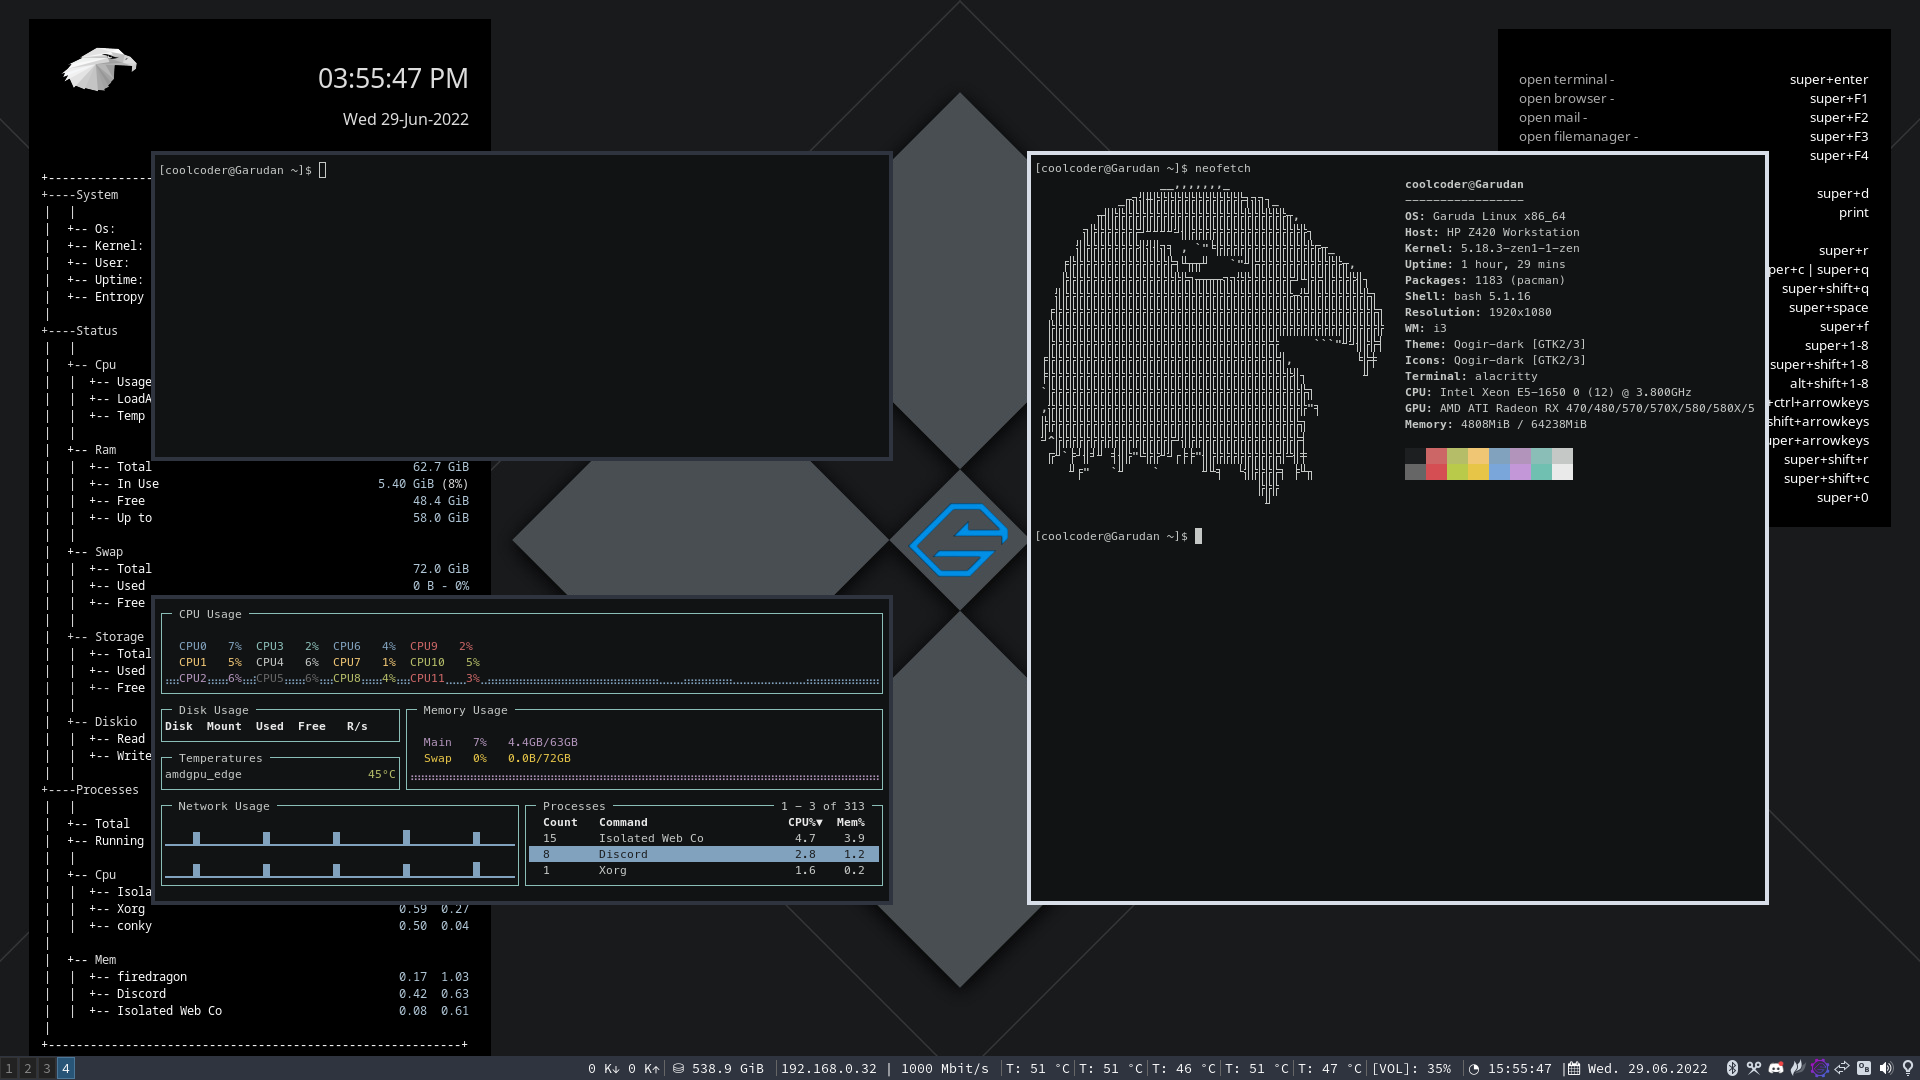
It’s supposed to be good for gaming, and debian wasn’t bad at gaming it worked quit well, but this is supposed to be more up to date than stable debian, so I figured I’d give it a shot.
It’s arch based so I’ll need to test it for some time before I recommend it, I didn’t have too many issues with Arch, I ran it for probably 5-6 years before I needed to do a reinstall. Compared to Arch, Garuda’s first time setup is super smooth, came with everything I needed to set up my bluetooth headset already installed out of the box, all I had to do was turn bluetooth on and pair. Which is better than debian or Archlinux, Arch is notorious for needing lots of configuration, which is justified. Debian I only needed to install bluez and the other bluetooth tools and then it worked plug+play after that, this simply came with it pre-installed right out of the installer.
New project again 1
I decided while playing with a new linux distro I should play with learning something new and practicing something old. I hadn’t done a straight C program in a while, so I’m working on learning ncurses and plan to make some sort of (potentially simple) text based game/thing with that.
new project again 2
Aaand I’m also back into Godot, looking at making some sort of VR project or something. not sure yet but figured I may as well now that I have my VR headset set up again.
Eventually I expect to get back to my game engine, but just playing with new projects for now.
-
I’m just gonna breeze in here this time and post that I made progress on adding a checkbox to my UI stuff for my game engine:
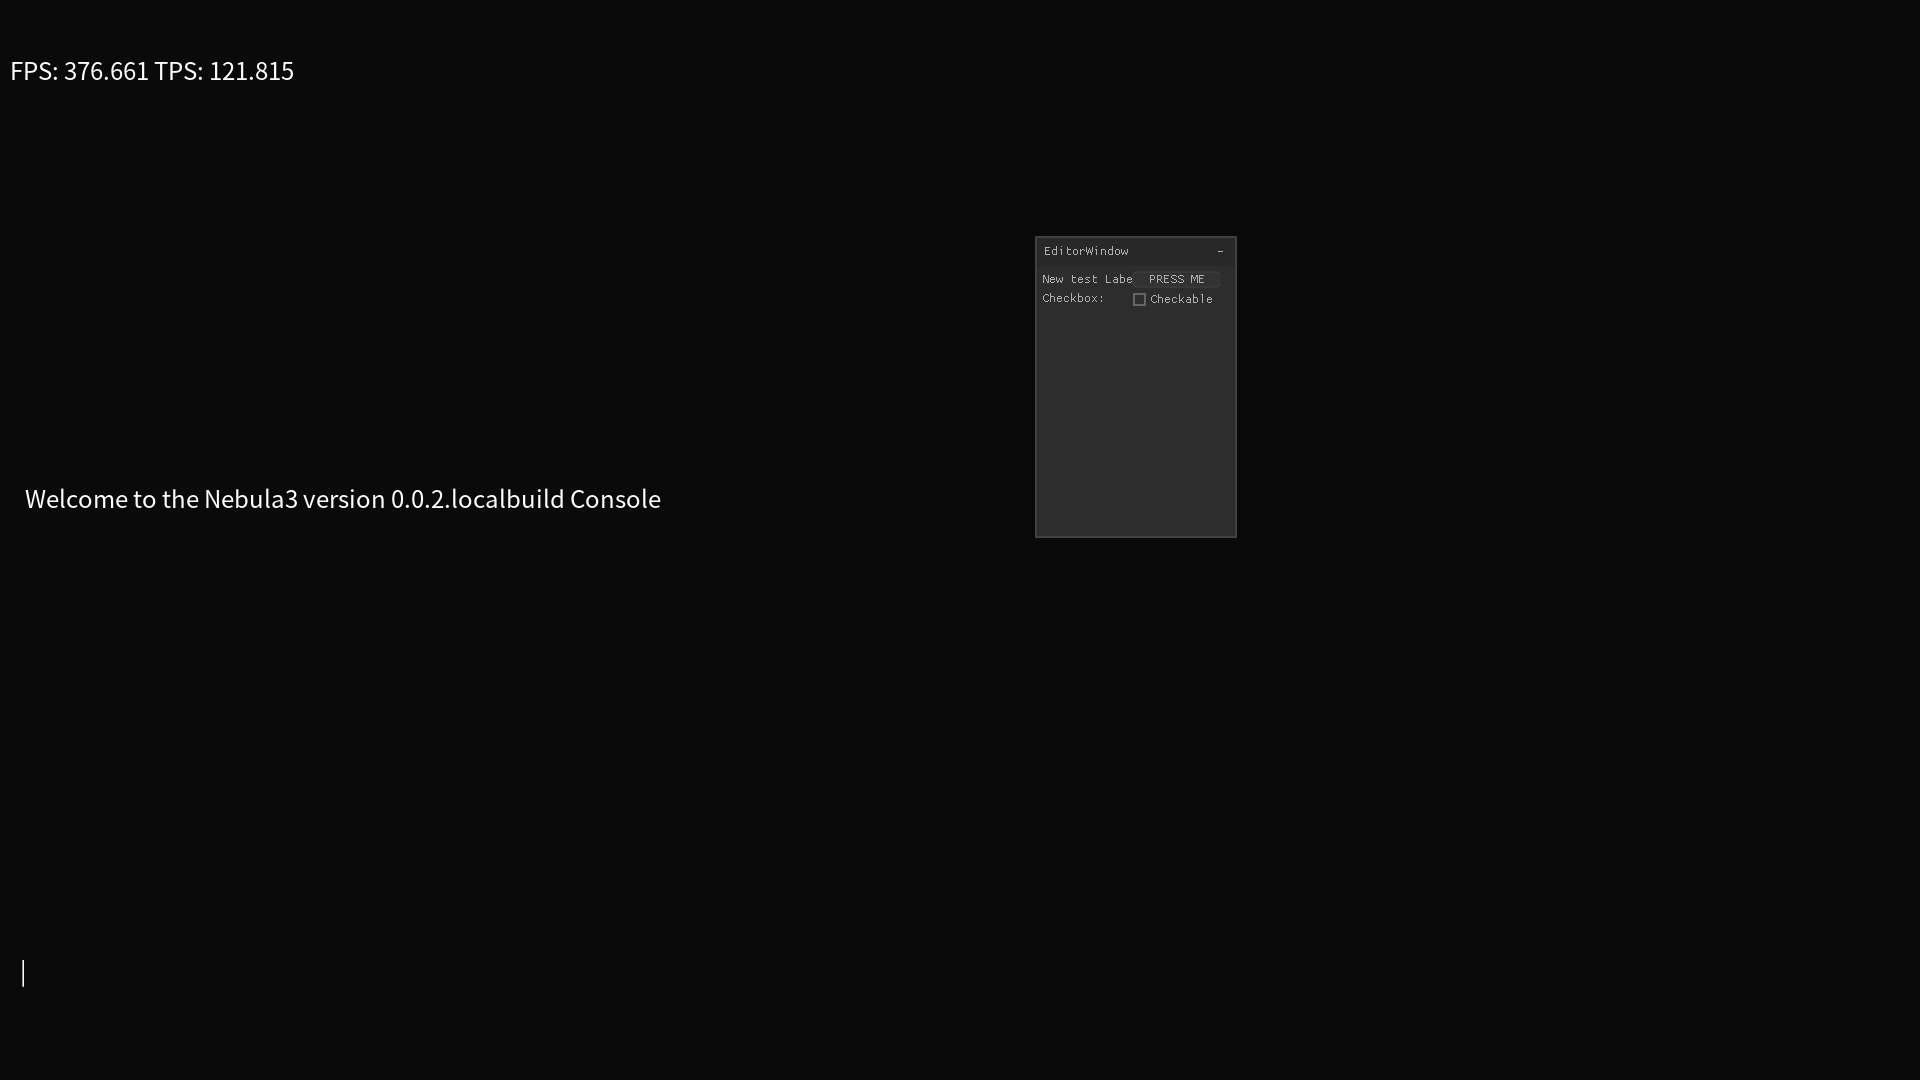
So that’s good, I can now have checkboxes! and each checkbox can have a label, can have the value be set/retrieved, etc.
The docs for Nuklear aren’t super precise on what specific ui widgets there are, and how to use them all, but i did find out that I think its also possible to get an “onClick” type action from it, so I’ll need to still set up bindings for that then I’ll be done with the checkbox.
So for now I have:
- labels
- Buttons
- windows
- “rows” which are basically a way to have a row of inputs in a window
- checkboxes
I think for a functional editor GUI I’ll still want/need at minimum:
- drop down menus
- textbox input
- radio buttons, possible I could just implement this with some horrible combination of logic and checkboxes
- scroll bars
And I think for a wishlist I would want but not require:
- file browser/picker/chooser
- To let picking assets or script files
- color picker
- to allow picking colors for things, this is mostly useless for now since I think my shaders don’t even support vertex colors or a blending/mixing color at all
- Sliders
- gotta have these for anything that involves sliding, not sure I can think of an application in my MVP editor use case
- progress bars
- some sort of scene tree type deal
Progress is going slowly, but its progress on my main project nonetheless!
One thing I think I should probably do at some point is mock up what I want the editor to look like, since otherwise I could probably get stuck in GUI widget implementation hell, so having a MVP type thing would probably be good enough to get the workflow figured out to know when I can basically put a stop to implementing GUI items and get the editor GUI and functionality togetherReally all that’s holding me back I think for now from having a “working” game is:
- No editor
- No ability to zip/package up data yet or “bake/package” it out
I think in theory it should be possible to have scripts that implement a basic game at this point but I just want to have an editor going first then do a game.
In all likelihood I could probably write up a basic breakout clone already that would mostly work. -
Tada, new project. again.
This time I’m working on an arpg first person dungeon crawler maybe open world type game. Something in the vein of Ultima Underworld.
Something with a 3d first person view but with plenty of UI stuff chonked next to it, like this (from Ultima Underworld):

The way I see it, this screen has a few basic parts:
- a set of action buttons on the left
- the 3d first person view with a compass, some animated aligator/dragons and enemy health meter gargoyle face
- inventory and equipment menu with health meters and a toggle to show stats.
- a text log that let’s you read text of what you’re investigating or interacting with.
So I have a quick mock-up I threw together in Godot:
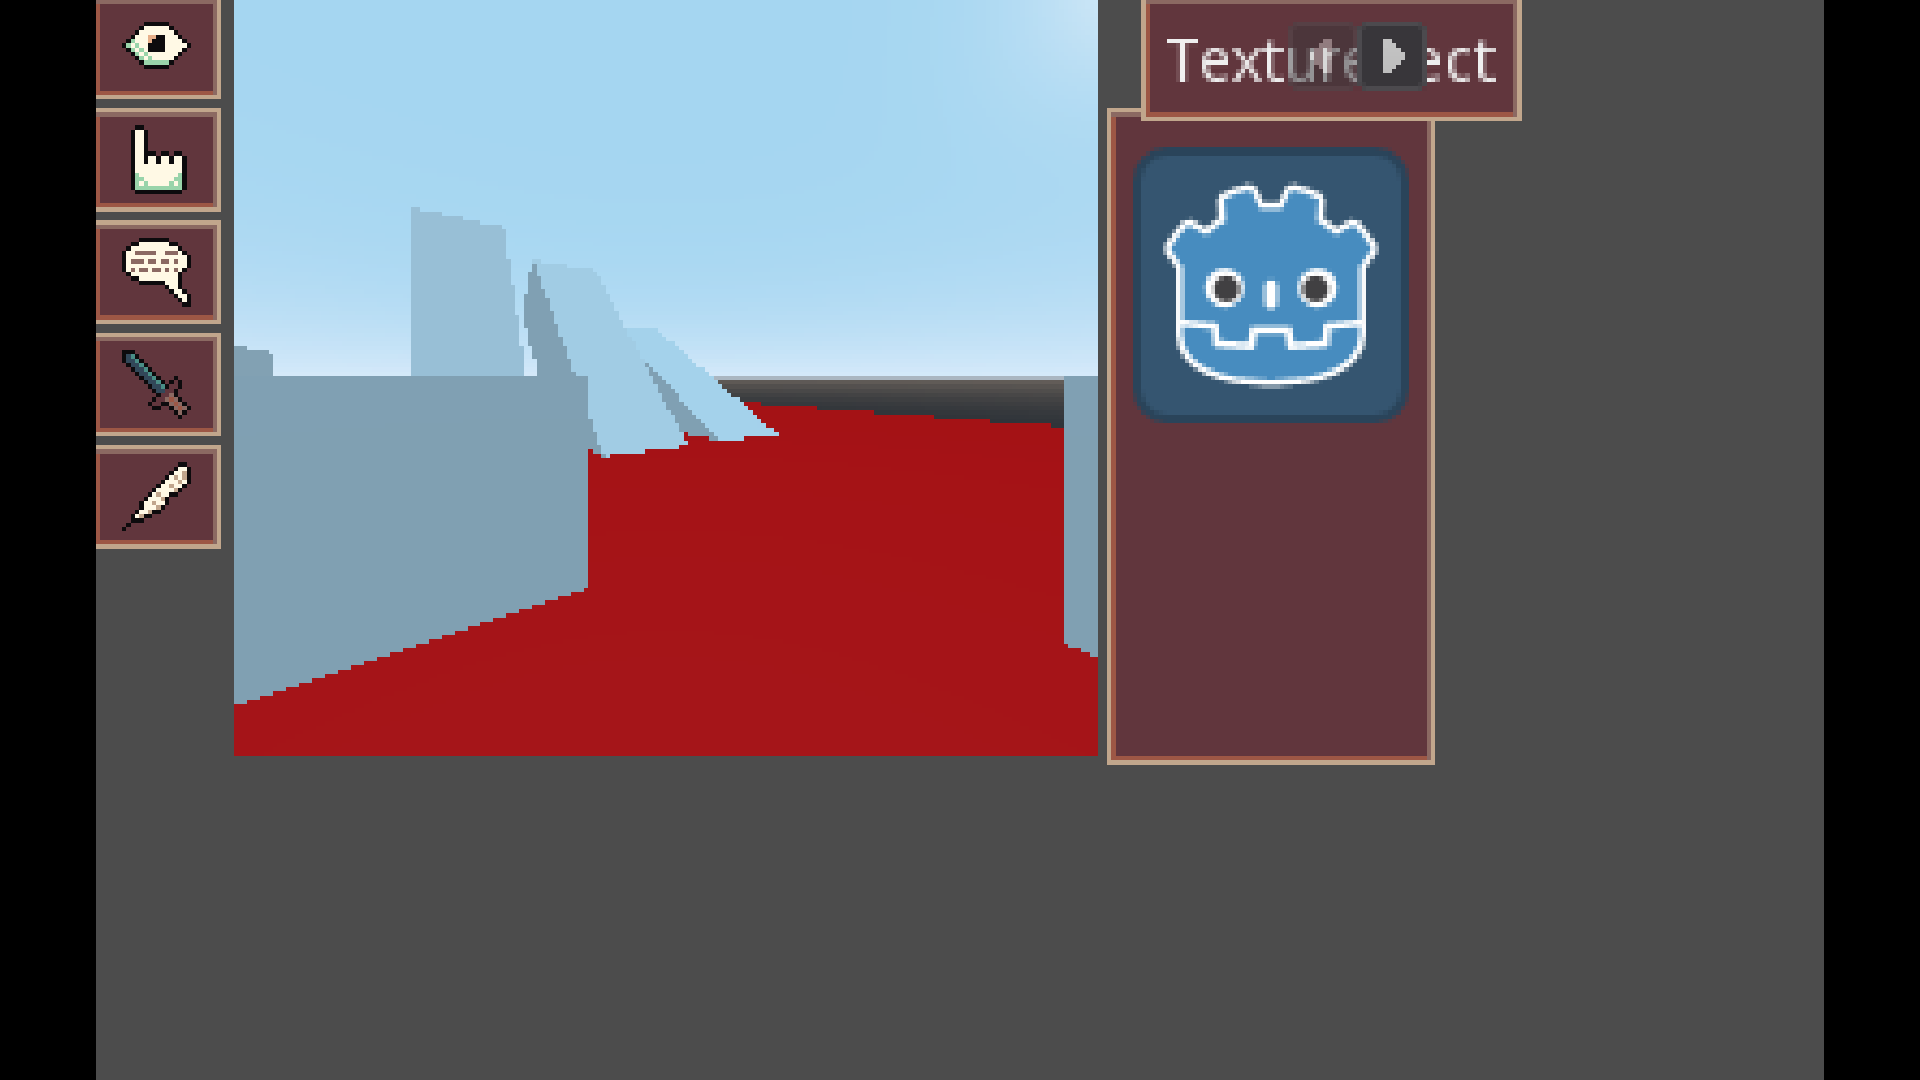
I’m not quite there yet, I’m still figuring out what screen resolution I like, aspect ratios, UI layout, etc etc.
But I have:- Action buttons on the left
- Look/examine
- Interact
- Talk/Speak
- Attack
- Save/Load (the quill works great if I have the caption next to it, I think a floppy disk looks better if there is not, maybe will reuse quill for a map/quest log)
- 3d viewport with first person view
- some type of tabbed GUI on the right for eventual inventory, stats tracking, health/mp/whatever
- bottom area I plan to also add a text log so I can have shitty programmer art that looks like garbage but can still determine what it is.
For now I actually don’t have mouselook at all, I decided to try to go “old school” and ripped out mouselook in favor of letting the user click around on things, and they can use WASD to move forward and back, strafe/side step left and right, and then Q to rotate left and E to rotate right. I think that works out slightly better to let the user click on/interact with specific things in a scene, and hopefully will give it more of an older school vibe.
One thing I don’t know if I"ll implement is that Ultima Underworld does implement turning if your mouse is near the edges of the 3d viewport, that might also be worthwhile to implement so I may do that too, we’ll see.
I think next order of business is figure out world loading, kind of the menu flow from main menu, gameplay, and basic player save/load, then I"ll work out the stats/combat, and inventory/equipment pieces.
I think in the end I want to implement basic dialogue, inventory, and maybe a quest system, along with a stat based arpg system setup.
For style I know I want it to have crunchy pixels and I picked out a few different palettes from Lospec, so I’m hoping that if I limit myself to the same few palettes it’ll look somewhat okay, but if not then I guess it’ll probably be fine. So far I have one palette picked out for UI stuff, and one that I"m using to draw up some equipment in libresprite.
Here is some of that equipment textures/sprites work I did:
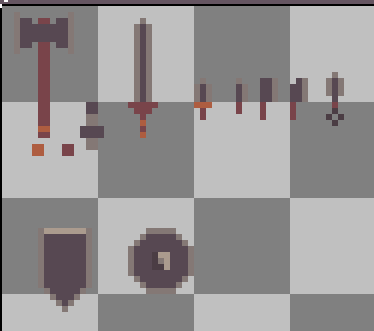
I think it would be cool to model some of it in 3d and then just map pixel art onto it as textures, but I might also just go with 2d sprites for some of it. I think monsters/creatures makes sense to be 2d sprites but it might depend on what it is.
-
Engine progress again
I’m back at in on the UI stuff for my game engine.
My september jam didn’t get very far, will probably pick it up again at some point, but I’ve been distracted by VR stuff again, and interested in potentially making my engine have OpenXR support sooner than planned, but of course I’ll need a working editor first, so I’m working on the UI pieces.
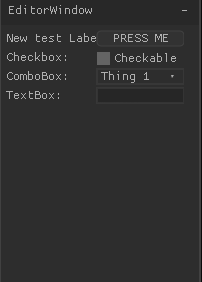
I added a combo box and a Text box to my UI widgets, I’m still trying to figure some things for the text box, since for some reason it isn’t working, but the combo box operates well as a dropdown.And here’s an example of the problem, using the same input callback, my own console that I rolled myself captures every character input, but for some reason the Nuklear UI textbox only gets every 3rd or 4th character, and its unreliable which it gets.
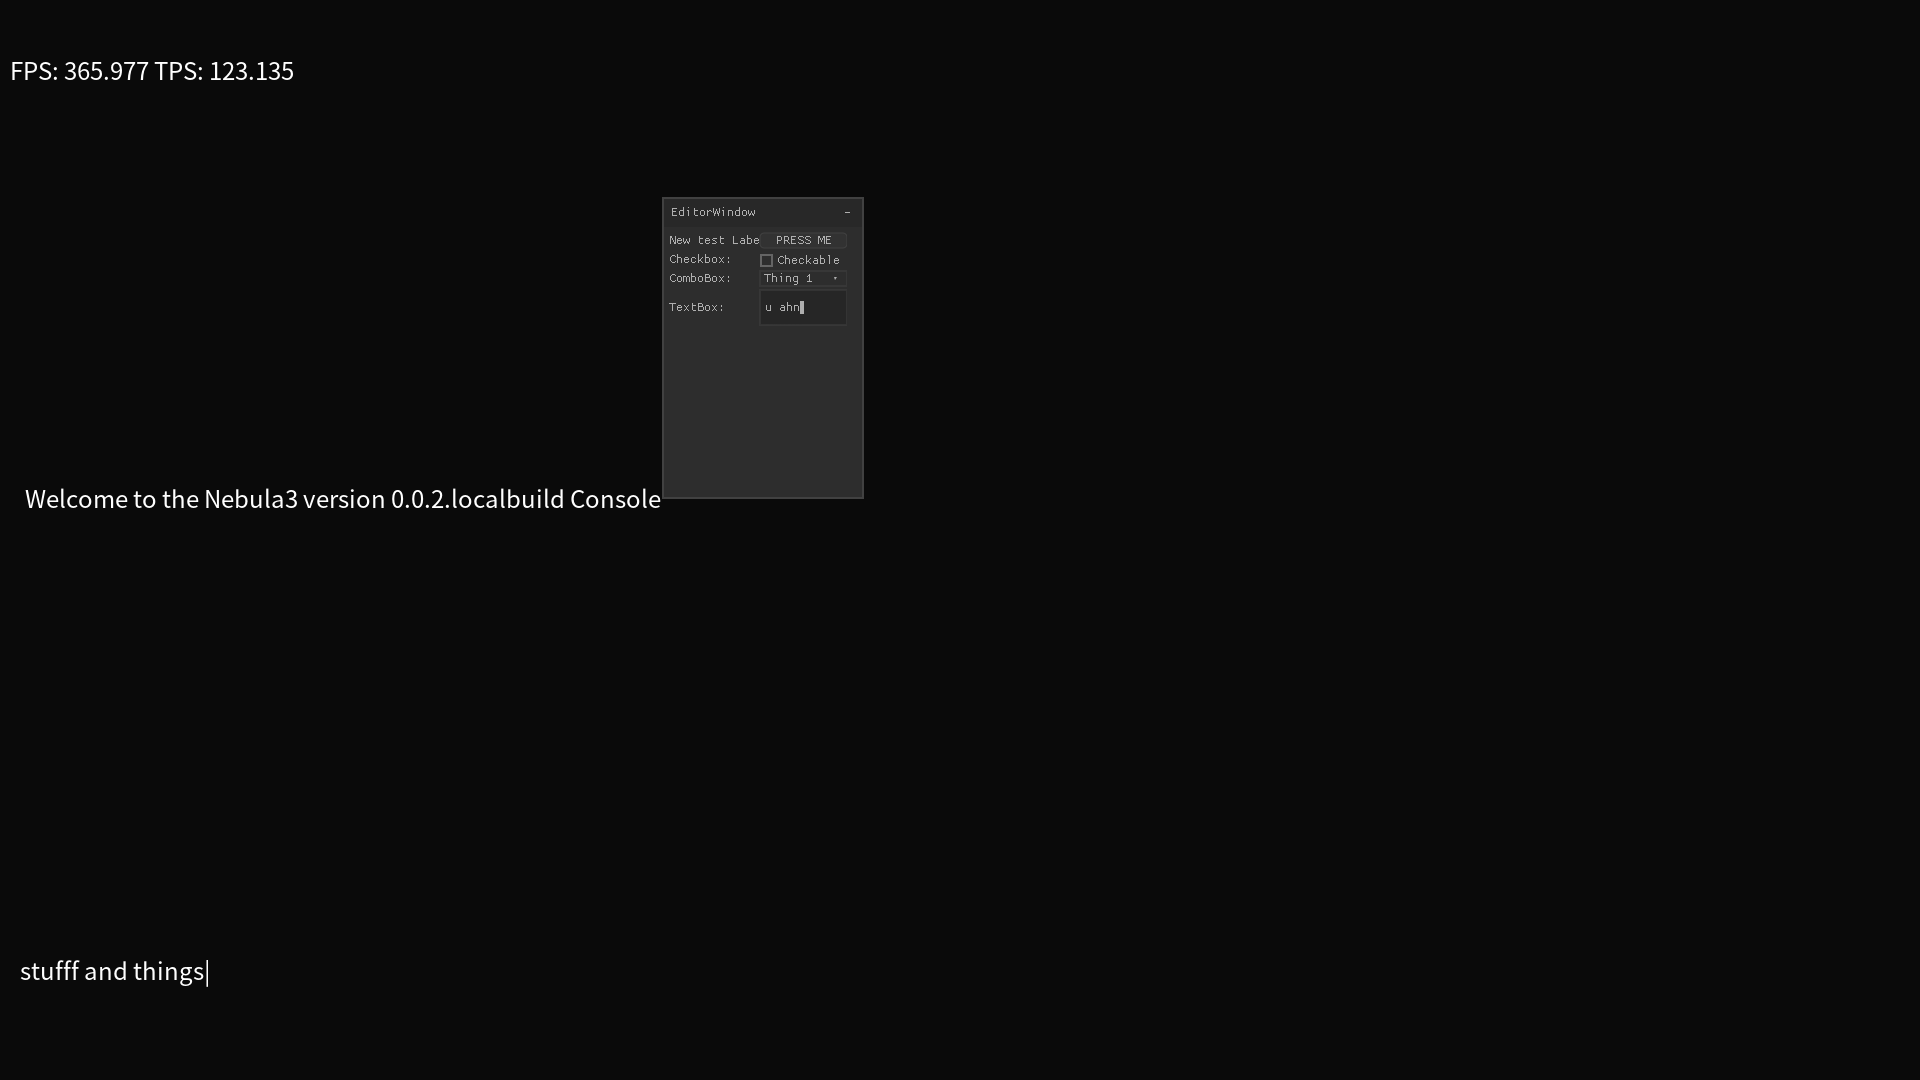
Once I have those widgets all working properly I think it’ll be time to get an actual editor of sorts together, get model loading going, and then get onto the level saving/loading and asset packaging pieces.
Oh and I just noticed that if I sit in the engine long enough, the stupid thing segfaults.
My other project was to learn Vulkan in Rust, which I just might pick up instead of this engine since I’m running into so many memory issues.
Like I have no problem debugging mem issues, but it sure seems like I might have a higher chance of making a working engine if I go that route instead of this. But that would be another complete rewrite, and I’ve been enjoying this iteration. Not sure I feel like completely re-writing and starting from scratch in Rust, so we’ll see. -
Wow I’m trying to make a new gruedorf and it’s been so long that I got asked to make a new one because this topic was so old…
Decided from some discussion in the discord to do some smaller godot projects just to keep the creativity/learning/whatever going, rather than biting off a bigger project than I can chew and continuously starting new things (looking at my VR project I had).
So I made a very simple/basic Sokoban game in Godot. it’s not really finished but it has some of the basics. Blocks that move and can block the player (I used the physics system to move them, which is a bit troublesome/error prone for a sokoban, I’m thinking I should change that if I go to a full/proper version with this kind of concept.) And it had a winning screen, multiple levels, and a main menu, that’s it.
I also have gotten back into working on my engine a bit now, but I think I’ve come to the conclusion that I need to work on making it crash less as a priority, so I’m going to pause on the Nuklear UI under the assumption that it’s causing the crashing, I’m going to work on finishing the last render thread vs update thread splitting I needed to do to ensure nothing crashes there, and then I"m likely to implement my own UI components at least temporarily until I can either confirm that Nuklear is or isn’t crashing things, or figure out how to get Nuklear to not crash.
Fundamentally I have a mechanism right now to let entities with the right script setup to get text input for the console, so I just need to add a way for UI items to get click events, and then in theory I should be able to just implement UIs fully in lua scripts, with just rendering stuff via textures or other fun mechanisms. So I think that should be enough to let me cobble together a UI from lua if I can just have a way for the scripts to get mouse clicks and text inputs. The look of it may not be super flashy yet since I have no good way to really do animations at all, maybe I’d find a way to cobble together a button press animation for buttons, but for now I think making good UI is not on the top of my list, I just need to be able to make a UI, that way I can have an actual editor somehow. might be a bit funky as far as setup/usability goes but I have hopes that it’ll work out.
Really all I need an editor to be able to do for now is let me place objects at locations, modify those objects, attach scripts, and add other components.
Then also have some buttons to let me save out a scene and the data and then at some point figure out how to have it all get packaged up for an actual end game, and then figure out how to have the game play in editor. -
Time again for another update I guess, not much to report but I’ve been doing some good rework to make just the Texture loading for now be able to happen on a different thread from the update thread or the rendering thread.
So for that I have a threadpool that I think I yoinked from somewhere, which let’s me basically queue up functions or lambdas to be executed in the pool of threads. I can also configure how many threads are going to be in the pool, which I currently have set to 3.
Then I also found I needed a way to reference the future Texture that will be spat back from the thread once it’s loaded, so obviously I looked at std::future.
And then found that std::future doesn’t currently have a way to check if the value is ready without waiting for it, that’s an std::future experimental feature, since the std::future valid (or shared_future, for what I would use this for) only checks if the future is a valid future, not if the value/data was set.
So i rolled my own templated
FutureClass to simply have a way to set or get data from it, as well as tell if the data has been set or not with an isReady().
This means now all mystd::shared_ptr<Texture>will need to becomestd::shared_ptr<Future<Texture>>so that’s quite a bit of refactoring, which I think is mostly done now.One gotcha with this though, is I didn’t want my Future’s
getData()to return the value, since that would be a lot of copying, so now instead of beingT getData()it’sT* getData(), but that means now I have to be careful that the Future doesn’t get decontructed when the data is still referenced somewhere. This is a real problem because right now the Texture data is being passed via standard pointer like this to the Render thread, so there is in fact a possibility of segfaulting here.I’ll probably look into how to wrap that, maybe my Future will hold the Texture as a
std::shared_ptr<Texture>itself and return astd::shared_ptr<Texture>from getData instead ofTexture*, that would likely solve the issue because then theFuture<Texture>only holds a reference to the Texture that will clean itself once all other references are destructed, so it can stay in memory until after the rendering thread is done with it and then once it’s cleared out of the Update thread and the Rendering thread it’ll delete itself instead of leaking or becoming an invalid pointer that is used in the Render Thread.That’s the main scoop for now I think, good progress though since most of the errors of switching the
TextureLoaderto returnstd::shared_ptr<Future<Texture>>are cleared up now and thegetResourcefunctions for that will now toss a lambda into the threadpool. I think the jury is still out on whether or not it’ll all actually work but considering that I already use a similar mechanism to the threadpool for myworkqueuestuff, which is actively used, I think the lambdas and threadpool and everything should work, it’s only a little issue with thatgetData()returning a raw pointer and not a shared pointer and hopefully that’ll mean that now I won’t be bogged down as much doing Texture Loading.I’ll need to do a lot more of this in the future I think, although I realized that I may not need to do this to all of my types, but it’ll probably help for anything that is large enough since I suspect Disk reading all needs to be dumped to a different thread.
And uh, actually I just remembered I need to re-check what I put into the lambda, I need to make sure that the disk reading part is inside the lambda, I think I left it out in front of the lambda portion… -
You know its bad when you’re asked to just start a new topic instead of replying on your old gruedorf thread…
Been busy with a ton of stuff lately, work, games, other work, relaxation, cooking…
But what I’ve gotten into recently, aside from another new raylib project trying to port OSRIC into a computer game, is looking at trying to self-host things.
It’s a confusing world but one of the things that I’ve kind of been wanting to do for a while is figure out a file sync system that I could host on my own machines/hardware and have the storage saved locally, with potential cloud backups.
I’ve been looking at options and services for a little bit now, from cloud hosting providers, cloud storage options, etc and I think I’m finally going to pull the trigger on this, I’ve got an old clunky 11+ year old laptop, and an old dell optiplex 3080 micro that I’ve ordered a power supply for. So that’s at least 2 computers, so I may as well try to do something with them before I get a rack server.
Browsing the self hosted Lemmy and I found that a lot of people mentioned this thing called ProxMox. This is basically a fancy enterprise level tool for administrating virtualized servers. It lets you have clusters of various machines all running the proxmox bare metal software (basically its Debian with extra steps I believe) and then you can get a fancy schmancy web gui that you can control things with:
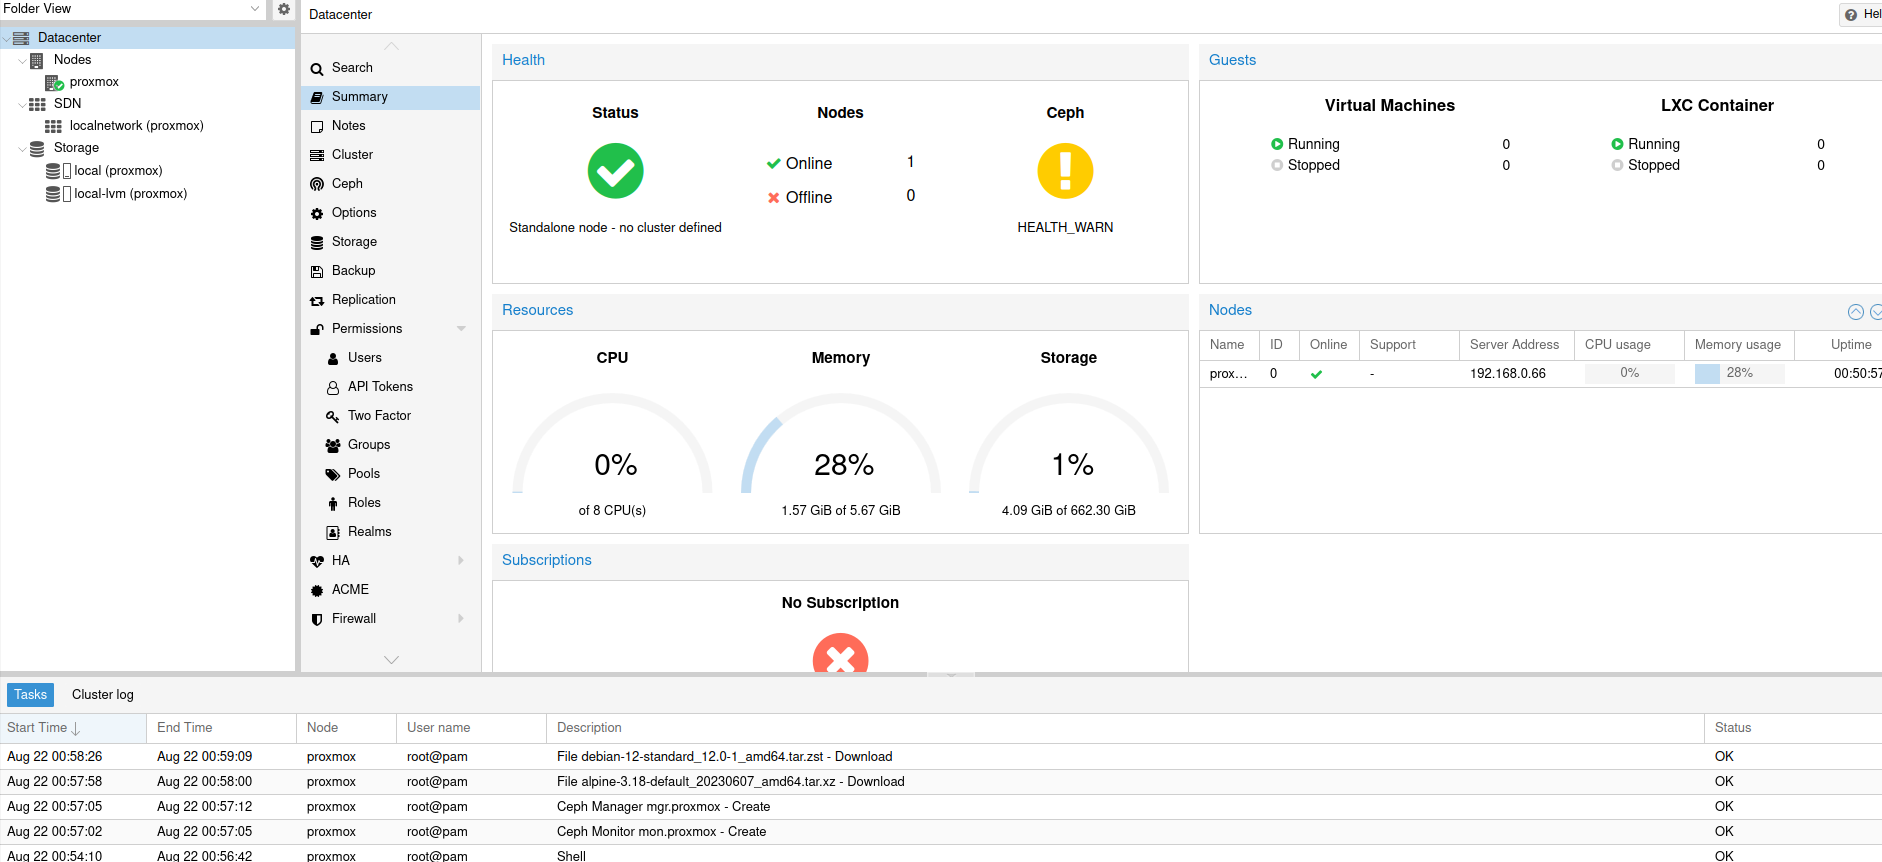
It also will help install and manage Ceph on all the nodes in your proxmox cluster, which seems neat to me as I’m also interested in that sort of thing, basically letting you replicate data stored in a local “cloud”.
So far I haven’t done any containers or VMs with it but I think that’s the next step I want to do.
I’m hopeful to be able to host NextCloud as well so that I can basically have my own synced file storage on my own machine.Whenever I need to reimage a machine or take backups, I find I tend to use google drive but I’m too cheap to pay for google drive, and so I have like two google accounts that are basically running out of storage. This way I could store all of the important stuff locally and then potentially back it all up to backblaze.
Anyway I guess I’m off to figure out how to run some containers in here and see if I can get docker+docker-compose working. if I can get those working in a container, I’ll be able to start hosting stuff like the Nextcloud, etc. Only weird thing there is I’ll be using containers inside of containers. Not sure if that’s necessary, but the containers are faster to run than VMs and I’m not sure if I want to need to go update+configure all the containers in proxmox directly, seems easier to have a docker compose file that defines the services and everything needed.
-
Well update on that, after like 3 days of struggling with nextcloud I’ve finally got that set up with working collabora-code
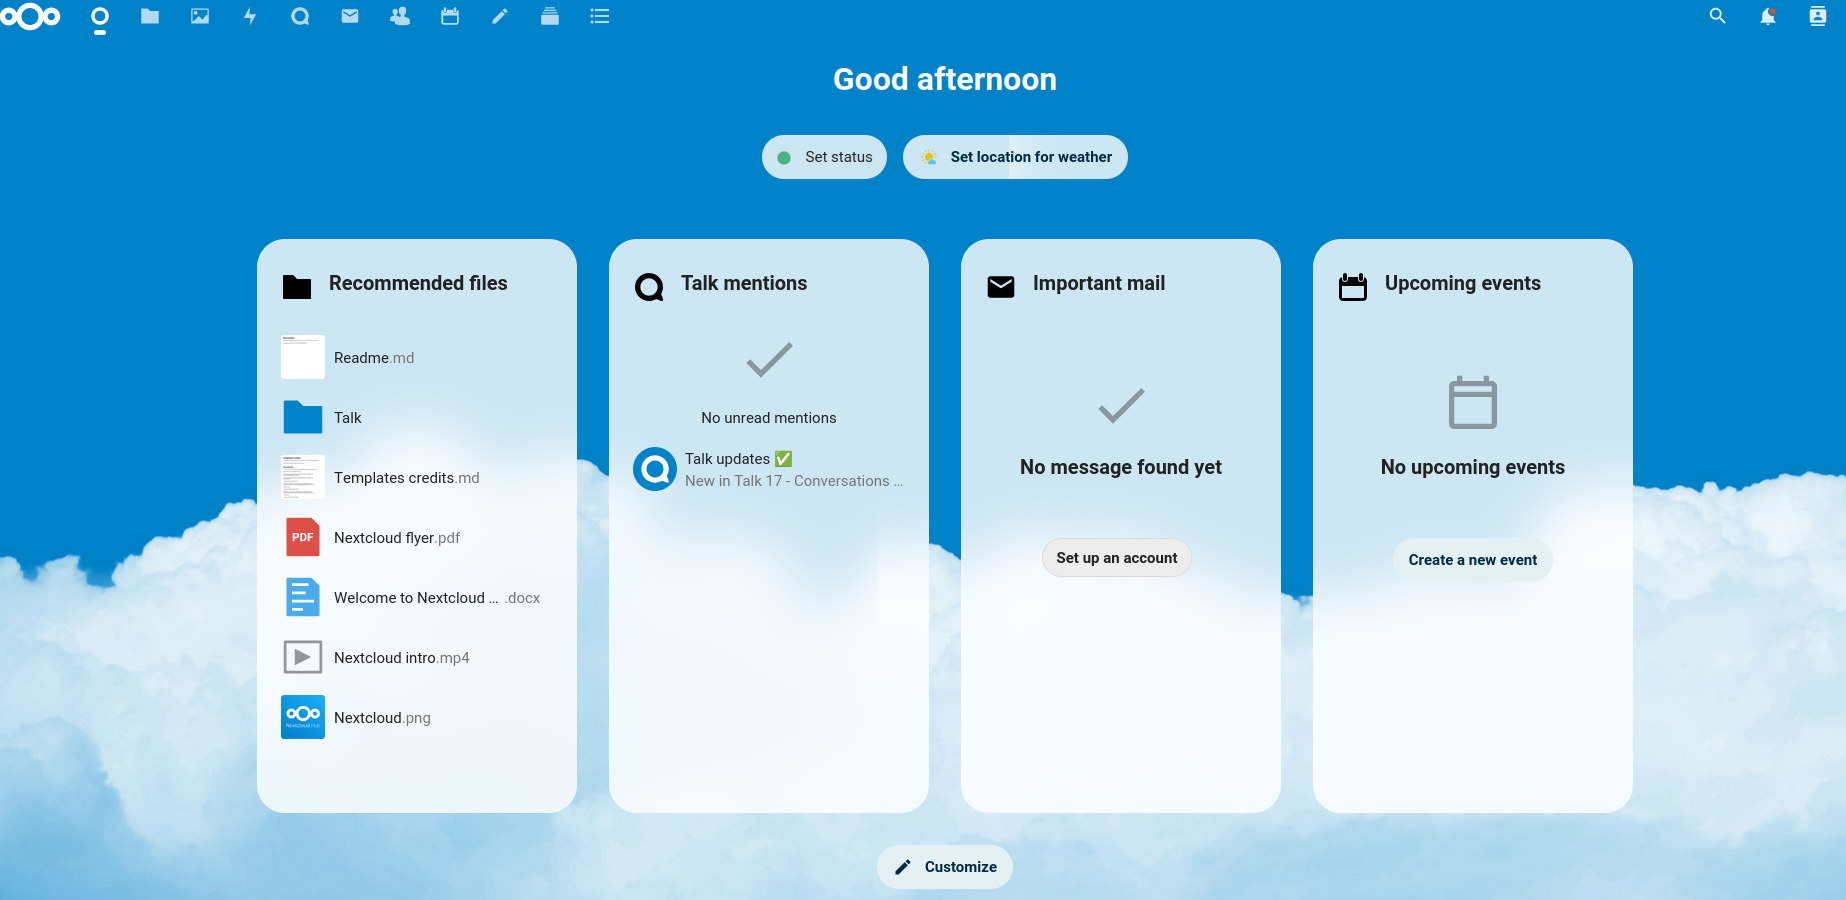
That let’s me have basically my own self-hosted “Google drive” or “Office 365” experience, so you can upload, sync, download, edit files online in my own self-hosted cloud.That looks effectively like this, you have a main dashboard with apps along the top left (looks similar to like, all the office 365, Desire2Learn school or work hosted solutions doesn’t it?):
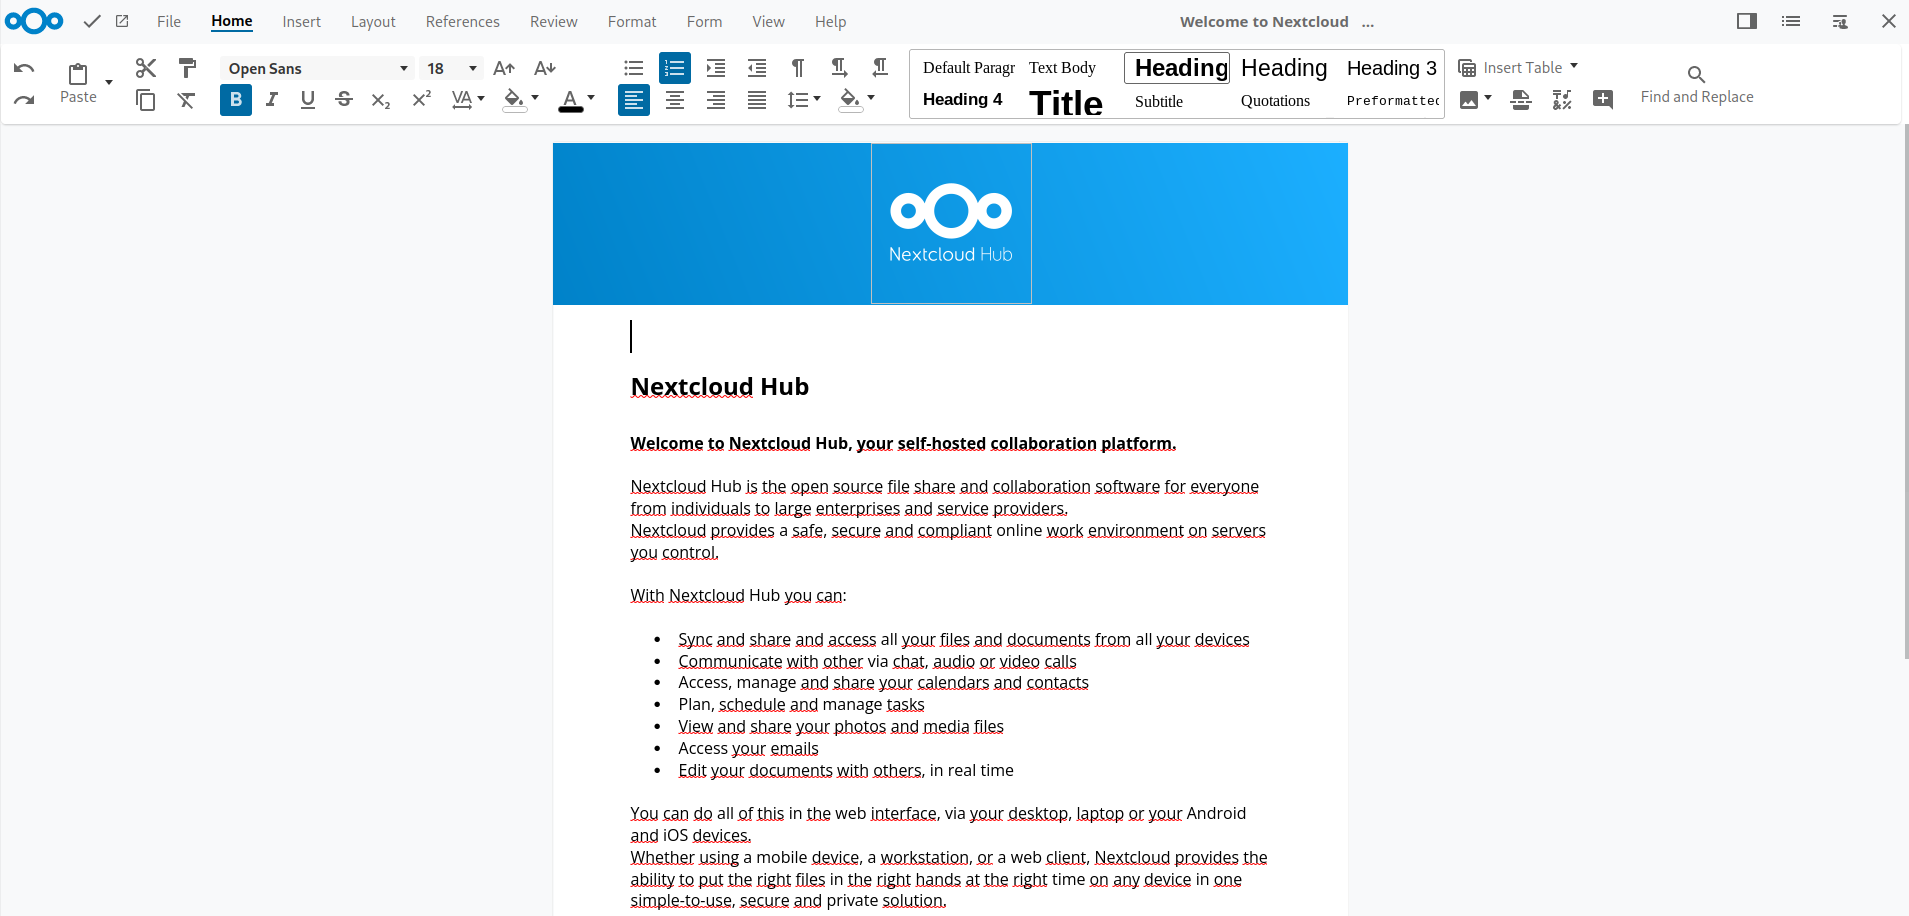
And then you can open up docx or other micro$oft files and edit them in browser, supposed can be done live with others as well (untested still, and I guess I must have issues with spellchecker right now…):
So next I’m going to be figuring out how to make sure my pivpn is set up so that these can be access remotely, I have them set up to be just HTTP instead of HTTPS since it wouldn’t work the other way.
This is my docker-compose file for it (saving here since I need to back it up now that its working, and it took 3 days to figure out):version: '3' networks: nextcloud: external: false services: nextcloud: image: lscr.io/linuxserver/nextcloud:latest container_name: nextcloud environment: - PUID=1000 - PGID=1000 - TZ=Etc/UTC networks: - nextcloud extra_hosts: - "next.cloud:192.168.1.125" volumes: - /home/nextcloud/data:/data - /home/nextcloud/appdata:/config ports: - 80:80 #443:443 restart: unless-stopped db: image: postgres:14 restart: always environment: - POSTGRES_USER=<DB_USER> - POSTGRES_PASSWORD=<DB_PASSWORD> - POSTGRES_DB=<DBNAME> networks: - nextcloud volumes: - ./postgres:/var/lib/postgresql/data collabora-code: image: collabora/code:latest restart: always environment: - DOMAIN=next.cloud|192.168.1.125 - extra_params=--o:ssl.enable=false networks: - nextcloud extra_hosts: - "next.cloud:192.168.1.125" ports: - 9980:9980 cap_add: - MKNODNOTE: don’t use this on anything publicly facing, I have HTTPS turned off, its “fine” here because I’m planning to only access it from via a VPN remotely, and not through the public internet.
Now that that’s all set up I need to make sure my wireguard can let remote machines use the pihole as the DNS server so I can get a locally defined domain to connect to the nextcloud.
Then its on to setting up a second proxmox node with SSD, migrating this to that, then reimaging the laptop with an SSD in place of the HDD. Got it a 512GB SSD for now, maybe up that at some point but I’m hoping to get a rack server as well at some point. Right now its at 600 GB HDD, so it’ll be a bit of a downgrade but I think SSD will be worth it.Right now honestly the browsing of nextcloud isn’t too bad off a HDD.
In other news of my self-hosting adventure, I also set up gitea.
That was way easier and faster than Nextcloud and almost too easy.
That one I haven’t considered ready for production just yet, I’m waiting until I get the second machine up and then I’ll probably look into having gitea pull over all my private repos from gitlab. It looks like that is a thing at least.
I may have my gitlab stick around and maybe see if I can’t get gitea to mirror changes up to gitlab as well, so I can have a redundant backup of any code projects I want to have.The one thing I want to make sure I can do is back up my crap out of these containers, since that right now seems non-trivial to figure out how I get just the files out of the volumes.
For now I am taking snapshots as necessary to basically save state on the containers, but of course having a way to get full backups out of just the files/data would be good, I don’t want to necessarily have a full image/backup of the machine that is running these things, I just want to have a way to get the file copies out of there and back it up somewhere, don’t really need to have the whole container image with it too. -
Been a while since I did one of these, but I’ve certainly been busy with plenty of new projects.
Started a bevy+Rust project, trying to learn how to do Wave Function Collapse to do world gen for it, since its winding up to be mostly some sort of roguelike rpg type game.
I’ve been playing Shattered Pixel Dungeon on my phone, and Nethack again, so being a roguelike fits in with that pattern.
For the WFC I’ve never done it before, but I did do something similar to it that I called “Wang Tiles” if you scroll back a few years.
In that case I basically had pre-built hand crafted tiles with edge connectivity, so the algorithm had to follow the edge connectivity constraints in placing those tiles. That worked well enough, especially with using random walk to ensure cross level connectivity.The way this WFC will be different, is that instead of hand crafting those tiles, I will simply be generating a sample level/world for it to sample from, then it will generate NxN tiles from that, which then it will figure out overlaps, and then map the tiles together.
A good example of that in the theory side is this article: https://www.gridbugs.org/wave-function-collapse/ It’s in rust as well, however I’ve noted that the code samples are not complete, so you can’t just crib it from there.
Specifically the problem I have is that none of these tutorials, descriptions, etc really say what the best data structure is to hold all of the tiles generated, as well as their connectivity.
That Rust example on gridbugs has tons of example Rust code, but just generalizes this part intoadjacency_ruleswhich is some struct with functions implemented on it that they don’t even cover or describe in the article.
And then the code in github is so large that I can’t make heads or tails of it to find the adjacency rules portion, and seems to be more of a library crate or tool to use to do wfc, and not so much a reference for building your own.This other resource: https://www.boristhebrave.com/2020/04/13/wave-function-collapse-explained/ is quite a good description of the logic flow for basic WFC, but it seems to move cover the basic 1x1 tile WFC, and not the NxN WFC, which it refers to as “overlapped” WFC. In that case it has a very simple method for determining/tracking the possible neighbor tiles, using an array of booleans for each possible tile in that slot, anything
trueis part of the “domain” and is possible to be in that slot.I’m attempting the NxN tile method, so its going to be a long process, I think first I need to generate all the NxN tiles as described int he gridbugs article, and then basically compute all the adjacency.
Then I think you’re supposed to do some entropy calculations and then use that to pick the next tile to place, and once you pick a tile to place you need to propagate down all the possible remaining tiles in the affected tiles, and its a whole freaking thing…Going to be a long slog I think, and I don’t even have rendering set up yet to render out the tiles in any way shape or form…
I’d have started with 1x1 tiles but for what I want to do I’d need to have like, tons of tiles to hold every possible different wall tile in different angles or whatever, and I think at this rate its better to just represent walls as just
Walland then either use one sprite for all of them, or go in after the WFC happens and then map the tileset onto the tiles.
Plus this way the tiles generated asWallwill also be entirely collision, although that means no diagonals, but I think I’m okay with that… -
New gruedorf time.
And another new project. Sort of.
Switching back to Godot for a bit, but I didn’t hit “New Project”! instead I opened an old project and now my new project is creating a Godot addon/plugin that automatically creates a controls menu which allows changing controls bindings.The idea is to basically create tools I can reuse in future to implement basic things like controls menu rebinding, maybe settings menus or other such things.
So far what I have is basically a script that creates a menu list of all the actions that are configured in the inputmap for the project, and then shows an icon next to it for any mapped buttons:
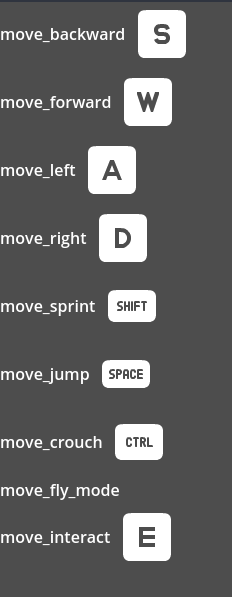
Using the Kenney input prompt icons of course, has support for mouse+keyboard, Xbox, PS4, PS5, Switch, Steamdeck, playdate. That’s enough platforms for me for now I think.
So far I’m only dealing with keyboard inputs, I’ll need to play around with supporting mouse input and then controller input bindings.
Then I hope to make it so I can select and then choose a new input option, making it play nice with controllers and mouse+keyboard of course.
I’m also ignoring all the built-in actions right now that start withui_because there are a ton of those and they kind of clutter up the list. I’m thinking for right now that people usually don’t want to re-map the buttons that are used to navigate the menus or do text input, so I shouldn’t bother to let those be an option for now.I’m also working on compiling Godot from source, once you have the dependencies its actually really easy to do, so that’s been good.
I found this Godot Build Options Generator which basically generates acustom.pyfile you can use to make your Godot builds be smaller and have unnecessary modules compiled out of them, for games that might not need all modules (like, if your game is entirely 2d, why bother with 3d file format import/export support, or even 3d support in general?)May look into trying to make some Godot Modules myself or other plugins as needed, right now leaning towards plugins that can just be included as part of a project to help get basic building blocks like menus working faster, maybe other features like my own character controllers or similar things like that.
I do use other character controllers or other plugins from the assetlib from time to time but for some things like character controllers I like to make it myself so I know all the ins and outs of it and how to make it do what I want/need.
Then maybe I’ll get something put together for an actual game that uses all these plugins, since doing the plugins should make getting a game together faster if it’s just a matter of including all the different plugins to make the boring parts work.
-
Some more progress on my plugin, moving some stuff out to a singleton to provide a better API where a game script can call into and then retrieve the right icon for an action.
Also adding a little “tutorial” prompt sort of thing:

Displays at the bottom right and disappears (not fade, just pop-in and pop-out directly with no transition right now) after a few seconds.
Might change that up to tween up from bottom of the screen or something like that.
But seems useful to be able to provide a way to just callcontrols.popPrompt("move_forward")and then the little pop up will just go, built-in, with the only thing needed to do is mapmove_forwardto a default key/control and then give a translation file for translatingmove_forward. Which I might change to say “Move Forward” rather than just “Forward”. Given this silly example which doesn’t seem to have correct/proper english.Other than that I think things are going well with this, not doing full joystick detection yet to remap things, but I think it should be able to detect whether a joystick/controller is being used vs if a keyboard/mouse is used.
Then the trick is to add controller support to the methodsgetIcon(event)andgetBestIcon(action)since thegetIcon(event)takes an InputEvent to give an icon for (useful for the full remapping menu to have an icon for each event) and then thegetBestIcon(action)would use the controller vs keyboard detection to show the right icon for that action based on which input they’re using, hopefully specific to their controller (which right now I’m not trying to detect too much, I have only 8bitdo controllers so I can’t really test this out too much).Once this is all together then I guess it’s a matter of making an game’s menu where the controls remapping menu would go, then adding ability to save out the mapping and ability to load in and reset the mapping, and also a way to restore to defaults. Almost there!
-
Been a long time for updates, I’ve gone onto several other games projects since my last few posts, and while those are fun I’m actually here to talk about something slightly more boring but possibly useful enough to share the code/pdf!
For work I end up taking a lot of notes in notebooks, but one of my peeves about that is I often end up with so many notes that I burn through notebooks fast.
Fast enough that I’ve decided I’m going to just print and bind my own damn notebooks (Some of the ones my wife got me on some sale deal lately are smaller than normal, so I burn through one notebook in about 2-3 weeks, they came as a pack of like 10 or so little notebooks, but it’s kind of bothersome to have to swap notebooks that often because it means I might have to reference something across multiple little notebooks.Part of having a notebook of course is having lined paper to print onto the copy paper in order to have some lines to write on, if I don’t do that my writing will warp all over the page.
You can find resources for printing lined paper all over the place, but the slight issue I have is that usually they’re meant for printing onto a solid 8.5x11 inch sheet of paper, which isn’t conducive to binding together into a notebook.
What I want is to basically print something sideways onto an 8.5x11 sheet, so that I can just fold it in half, stack a bunch together, and staple them together into a notebook segment like you might see in one of those fancy schmancy traveler’s notebooks.So to do this, I decided I may as well use LaTeX, it’s a tool I’ve used on and off over the past 10 or so years to make various pdfs of stuff.
I found this resource for how to make lined paper using LaTeX and tikz: https://michaelgoerz.net/notes//printable-paper-with-latex-and-tikz/It’s a good resource, and it got me 99% of the way there!
What I did was I took his college ruled letter size page: pdf download, tex source
And then copied out the college ruling, and then turned it sideways to landscape, added little date lines at the top left and right sides of the sheet of paper, and then duplicated all that to be on a second page too (because when printing multiple copies, a printer does not want to duplex print the same document onto each side of the page, for whatever reason when test printing it decided to just spawn a new page entirely for each copy of a 1-page document. Yeah I guess that makes sense when you normally print multiple copies of a document, but that means we need to have two identical pages in our pdf in order to print it properly)So here’s the code:
\documentclass[letterpaper, 10pt,landscape]{article} %for letter size paper
%215.mm x 279.4mm
\usepackage{tikz}

\begin{document}
\pagestyle{empty}

%page 1
\begin{tikzpicture}[remember picture, overlay]

\tikzset{normal lines/.style={gray, very thin}}

%draw date lines

\node at (current page.south west){
    \begin{tikzpicture}[remember picture, overlay]

        %left side date
     \draw[style=normal lines] (0.15in,8.0in)--(0.55in,8.0in);
     \draw[style=normal lines] (0.65in,8.0in)--(1.05in,8.0in);
     \draw[style=normal lines] (1.15in,8.0in)--(1.55in,8.0in);

     %right side date
     \draw[style=normal lines] (9.45in,8.0in)--(9.85in,8.0in);
     \draw[style=normal lines] (9.95in,8.0in)--(10.35in,8.0in);
     \draw[style=normal lines] (10.45in,8.0in)--(10.85in,8.0in);
        \foreach \y in {0.71,1.41,...,19.81}
        \draw[style=normal lines](0,\y)--(11in, \y);
    %\draw[style=normal lines] (1.25in,0)--(1.25in,11in);
    \end{tikzpicture}
};
\end{tikzpicture}

\pagebreak

%page 2
\begin{tikzpicture}[remember picture, overlay]

\tikzset{normal lines/.style={gray, very thin}}

%draw date lines

\node at (current page.south west){
    \begin{tikzpicture}[remember picture, overlay]

        %left side date
     \draw[style=normal lines] (0.15in,8.0in)--(0.55in,8.0in);
     \draw[style=normal lines] (0.65in,8.0in)--(1.05in,8.0in);
     \draw[style=normal lines] (1.15in,8.0in)--(1.55in,8.0in);

     %right side date
     \draw[style=normal lines] (9.45in,8.0in)--(9.85in,8.0in);
     \draw[style=normal lines] (9.95in,8.0in)--(10.35in,8.0in);
     \draw[style=normal lines] (10.45in,8.0in)--(10.85in,8.0in);
        \foreach \y in {0.71,1.41,...,19.81}
        \draw[style=normal lines](0,\y)--(11in, \y);
    %\draw[style=normal lines] (1.25in,0)--(1.25in,11in);
    \end{tikzpicture}
};
\end{tikzpicture}

\end{document}
Run that bit through pdflatex and you get two pages that look like this (can’t upload the pdf because of reasons…)

Print them duplex, flipping on the short side (since this is landscape) and then presto, you got a double sided sheet with lines that you can print a bunch of and then fold and staple to make your own notebooks.
I haven’t run all the numbers here on cost savings but I think it’s safe to say that when you get 1500 sheets of copy paper off amazon for $23 it’s going to be cheaper to make 1500x4 pages of notebook paper (remember we’re talking the 8.5x6.5 sheet from folding the 8.5x11 in half, roughly equivalent perhaps to an A5?) than it is to buy that many pre-made refills of a notebook.
In fact some of the inserts I’ve finding for traveler’s are even narrower than these, running 8.25x4.25, so this may even be bigger sheets of paper!